Thursday, May 30, 2024

Garden 2024 - Spring


   As readers might recall, I bought the components and set up an emergency power system using solar panels and battery storage. And since I had all that power just sitting around waiting for an emergency, I set up a simple grow light system. That grow light system allowed me to get seeds germinated and sprouts growing at least a month before I ever had done before due to the normal cold, wet springs in Pennsylvania. Now, as we roll into June (tomorrow), I already have a well-established garden growing strong.


  This smaller raised bed has about thirty lettuce plants and twenty onions doing really well in it. As the days heat up, the lettuce will be affected but until then I am eating salad every day and it is really good.


  In this longer bed, I have fifteen green bean plants two peppers, and four sweet potato plants growing. I intend to get a couple more pepper plants and will fill in the gaps with root vegetables.


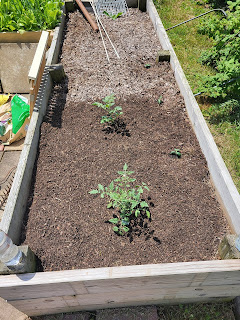
  In the other long bed, I have two tomato plants and three cucumbers. I will do a second planting of green beans in the far side of this bed later in the summer to be my fall crop of beans.


  I planted two more sweet potatoes in this low raised bed and staked in a trellis for them to grow up to save ground space.


  I have about twenty potatoes growing in this bed. I will add wood chips and other organic matter to the bed as the plants' foliage grows. This bed was fallow last year, and I piled on six inches of mulched grass and leaves to it in the fall and covered with plastic, so it is raring to go. 


  I still have lots of open spaces that I want to fill. I just need to look through my seeds and see what I want to grow.

Wednesday, May 29, 2024

Pickling Beans

   I often end up with more beans than I can eat whether they are from the garden or from the store. Instead of letting them go to waste, I pickle them using leftover pickle juice from commercial pickles.

  We often buy gourmet pickles from local venders and these come in all sorts of interesting flavors. After the pickles have been eaten, I store the unused, leftover juice in the refrigerator until I have some extra beans.

  The first step is to clean and sterilize the canning jar. I usually use one pint jars for beans. While the jar is being sterilized in boiling water, I wash, sort, and size the beans, enough to tightly fill the jar. Make sure the beans are clean, select only young, firm, and unblemished beans, then cut them to length. You want the bean to be one half inch shorter than the inside of the jar height. This is to make sure all the bean is under the pickle brine when the jar is filled.

  Next, I pour the pickle juice into a pan and bring it to a boil. Generally, the pickle juice is sterile but why take a chance. Boil it for five or six minutes. 


  While the pickle juice is boiling, take out your now sterilized canning jar from its boiling water and dump in all your trimmed green beans so that you can blanch them. I blanch the beans for four minutes. Blanching sterilizes the outside of the bean and slightly softens the texture of the pod.


  While the beans are in the boiling water to blanch, fill a large mixing bowl with cold water and ice. This ice bath is used to stop the blanching process and chill the beans.


  At the four minute mark, scoop out the beans and drop them into the ice water to cool down. Stir them around to ensure they all get cooled down to stop the blanching.

  Once they are cooled down, you can start packing the canning jar with the beans. I hold the jar sideways so that the beans stack on top of each other as I place them in the jar. Once the jar is full, push down on the tops of the beans to make sure they are even at the top, about a half inch to an inch below the rim. Now, carefully pour in the boiling pickle juice until all the beans are covered. If there are air bubbles in the jar, tap the bottom of the jar or use a spoon or fork to move the beans around until the bubbles are released and rise to the top. Once the juice is in and the bubbles are gone, screw on the lid and ring until it is snug but not tight.


  Place the now filled jar into the boiling water you used to blanch the beans and let it sit for six to eight minutes. This heats up the juice and air in the jar, expanding it.


  Once the heating time is done, take the canning jar out of the boiling water, set it on some sort of insulated pad, like a hot pad or even a dish towel, and carefully tighten the lid until it is firmly seated. Let the jar sit at room temperature and as it cools down the liquid and the air in the jar will cool and contract, which forms a vacuum in the jar. At this time, the lid will slightly collapse and you will hear a metallic pop. If, after completely cooling, the lid isn't depressed and you can pop it by pushing down on its center, the jar didn't properly seal. You can still use this, but you'll have to store it in the refrigerator until you want to eat some beans. But if it sealed properly, you can store these in a cool, dry shelf area for many months. 

  I usually let this jar sit for at least a month or two to let the flavors sink into the beans. Once you open the jar, you need to then keep the jar in the fridge and try to eat them within a couple weeks. 

  This is a delicious way to store some excess green beans and use up leftover pickle juice that you already paid for anyway.


Saturday, May 4, 2024

Repairing Oiler on Husqvarna Chain Saw

  Two weeks ago I was using my 20 inch saw and noticed that the chain was not being oiled. That isn't good, but, I knew what the issue was. Since I already had my tools out to fix another piece of equipment, I figured it was a good time to fix the saw.

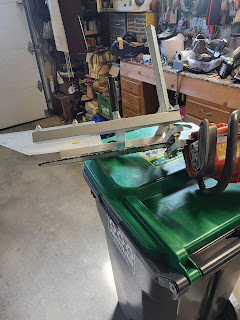
  I mostly use this saw for milling lumber, it has a special narrow ripping chain installed now. But I  also use this saw when I need a longer bar and more powerful engine for big cutting jobs. So, the first thing to remove was the milling guide. (A Granville Mill)


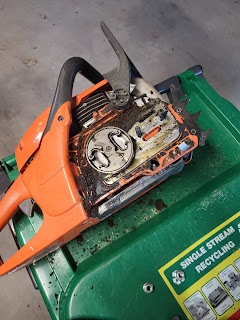
   Next, remove the cutting chain and the bar. Chainsaws all use the same size nuts to hold the bar and chain in place and they usually come with a three-in-one tool that has two sockets (one for the bar and one for the spark plug) and a flat head screwdriver.  The parts I need to get at are under that gray plate, under the clutch. So the next thing to remove is the circular clutch assembly.


   To remove the clutch you need to immobilize the piston so that the engine doesn't just turn when you try to unscrew the clutch assembly. There is a great hack to do this. 

  You turn the clutch until the piston is all the way to the bottom of the cylinder. Once that is done, you pack the cylinder with rope. This prevents the pistol from moving too far when you crank on the clutch to unscrew it. I crammed about 12 inches of 3/8 inch rope into the cylinder.


   There is probably a special tool for this that a proper shop would have, but pump pliers and a vise-grip pliers work just as well. The clutch is marked with which way to turn it to remove. Just unscrew it like the lid to a large jar. It has reverse threads so Righty Loosey, Lefty Tighty


   The clutch is in two parts. There is also a roller bearing on the shaft that slides right off. All that gunk has to be cleaned off before you remove the access plate.


   Under the plate is the auto-oiler. All that gunk is why it isn't working and that all needs to be cleaned out. A small flat head screwdriver, a tooth brush, rags, and copious amounts of gas are used to clean all this up.


   Then, it looks like this. That linear gear is turned by a plastic piece in the access cover plate. This works like a worm-gear, the two parts are at 90 degrees to each other. The linear gear turns a small pump, the square black plastic piece and the oil is pumped through the plastic tube going up and to the left.


   The clean access plate goes back on and is held down with just one screw. The plastic worm-drive, the black disk on the shaft, can be seen here as I reassemble all the clean parts. 


   The clutch goes back together in the opposite order from the removal process. There are two notches in the bottom of this part that fit over the worm-drive. The two pliers trick is used again to screw it down. You don't need to crank it down really tight, it will tighten up as it is used since it has reverse threads. 


   The bar and chain get reinstalled. While I had it all apart I cleaned the air filter, the spark plug, and used high pressure air to clean off all the other parts of the motor. It won't stay clean long, but I clean it good two or three times a year anyway.


  Start the motor and rev the engine for a bit and voile, oil is now flowing to the chain.


   Some thrown oil on the driveway is more proof the chain is now getting enough oil. Good job and I saved myself at least $100 and two weeks of time by doing this repair myself.