Thursday, April 11, 2013

Build a Cold Frame

What is a cold frame? In its simplest form it is just a box with a transparent cover, which allows you to start seeds or plants outside when it is still too cold to plant in the garden. The transparent cover lets in sunlight, which warms up everything inside of the box and the soil. While the sunlight is not as direct or as strong as it is in the main growing season, it is enough to get plants started or even to grow cool season crops like lettuce, spinach, radishes, and onions, to name but a few.

I have wanted a cold frame for many years. My dad had one when I was a kid but I don't remember how successful he was with it. I used plastic sheeting in The Netherlands to create something similar to a cold frame and it was very effective.

Being a bit of a cheapskate, I wanted to build one for as little cost as possible. Below is my project.

Keeping cost in mind, I choose to use 5/4 inch deck boards for my box. 2x6s or 2x8s could also be used and would have a better insulating value but they would cost twice as much. I bought seven 5/4"x6"x8' boards for my project. What I have found over the years is that these boards are saturated and if you build something and let them dry quickly outside they will warp and split something terrible. So I now stack them in my garage with slats between them and the top board weighted down so that they dry slowly and evenly. The weights, in this case pavers, keep them flat as they dry. It took three weeks to dry them and I put a fan on them for the last couple days.


To cut down on waste and to get the biggest number of square feet inside the box, I cut my boards so I had a five foot piece and a three foot piece. That would give me 15 square feet of soil surface once the box was put together. If I had cut the boards in half, two four foot pieces, I would have 16 square feet of soil surface but it is very hard to reach to the back of a four foot box. You should always cut treated lumber in a well vented area so that you aren't breathing in the fumes and saw dust. I used my garage with all the doors open. It gave me a flat work area and plenty of fresh air.


Always use a square to get 90 degree cuts and accurate measurements. It is not fine cabinetry but it will certainly look better and be stronger with accurate cuts. I used my battery powered circular saw, one of the best free scavenged items I have found. It was perfect for this project. But you could do this with a plug in circular saw, a table saw, or even a hand saw. I did finish a few cuts with a hand saw so that I wouldn't have over-run cuts.

I used two inch deck screws to attach all the parts. Treated lumber, and being outdoors, will rust plain screws or nails in a short time. I prefer screws to nails because they hold tighter, stay tight longer, and can be taken apart easier if you make a mistake (which I did) or you need to make an adjustment. Deck screws are self tapping but I always pre-drill screw holes. That eliminates splitting. I used a bar clamp to ensure the boards were tight together. The box should be as air-tight as possible to retain the heat.

Each corner was braced with a 2x2 instead of trying to screw the flat boards together. This is much easier and far stronger. The long sides had a third brace in the center, which you will see in the next pictures. My boards were not perfect, they seldom are, and so I chinked between the boards with sisal twine, much like wooden ships were chinked, or lapped, in the old days. When the twine gets wet it will expand and completely seal the small gaps. I used a putty knife to force the twine into the hair line gaps.

 As you can see in the photos I set the box on a foundation of brick. It is not necessary but I like the look and it helps to protect the bottom of the box when I am working the soil with tools.


Here you can see the two center braces to strengthen the long side of the box. The front brace is on the inside and the rear brace is on the outside. The rear brace is on the outside because I installed a long mirror inside the box, as you'll see below.

For this spring I just used a plastic bag that I had in the garage to cover my lid. It came from a large poster my son bought. Perfect fit. The lid is another 5/4x6x8 that I ripped to two inches and then cut to length. The center piece is one inch wide. The top frame is glued and screwed together and is quite sturdy. I attached the lid to the box with four small hinges. You can see the mirror inside. This will reflect light from the back of the box to the front during the early part of the day. This lights up a shadowed area.


And here is the finished Cold Frame. I will install a latch on the lid so the wind doesn't blow it open and I have ordered an automatic opening device so that the box doesn't over heat and cook the plants. Everything combined was less than $50 plus the opening device was another $44. It wouldn't be necessary if I lived there full time; I could raise and lower the lid as needed.

Last weekend, after placing the Cold Frame in my garden, I planted onion, radish, lettuce, and spinach seeds using the square foot gardening method. I should have some plants growing by next week. I'll keep you posted.


Tuesday, February 12, 2013

Seed Catalogs

It is that time of the year to start ordering seed catalogs. There are national seed companies of course; such as Gurney's and Burpee. I have ordered seeds from both and was completely satisfied with them. But you should also do Internet searches for local seed and plant companies/nurseries. It is always better to buy seeds/plants that are grown in your local area. This more or less ensures that the plants will thrive in your growing zone.

If you eventually want to save your own seeds, for more assured availability and self-sufficiency, then you should look for "open pollinated" seeds. Only open pollinated seeds grow plants from which you can save seeds and the seeds will produce plants true to form. The other main stream seed companies sell mostly hybrid seeds. You cannot save seeds from hybrid plants and then expect to grow plants from them the next year. Because they are hybrids, you never know if they will germinate or what will grow from them if they do sprout. Do an Internet search with the term "Open Pollinated Seed Companies" and you will get quite a few hits.

Johnny's is one company I intend to check out this year. They sell forage seed (amongst a lot of other products) and I have cleared a 20-30 foot edge around one of my fields and want to seed it for wildlife food plots. Because I have been an absentee land owner for 30 years, brush and trees have been encroaching on all my farm fields. This winter I have been pulling out the brush and small trees as well as cutting back over-hanging branches. It has been a lot of work but I owe it to my tenent farmer to free up more cultivatable land. I will maintain a food plot ring around each of my fields as I clear them. This will support more wildlife and make it easier to cultivate the fields.

Seed catalogs generally also contain planting, growing, and harvesting tools and supplies. None of them are needed, but many of them will save you time, make your work easier, and extend the growing season. The catalogs will also give you ideas of new crops to try out and the descriptions will help you select the right seeds for your growing plan. If you do intensive gardening with successive crops, you will need to select early and late ripening versions of the crops you want to grow. Just keep in mind, the catalogs are designed to sell their product so do your research before buying.


Wednesday, January 30, 2013

Dressing Metal Tools

Metal on metal is a dangerous combination. Generally, hammers and other striking tools are made of hard steel and the tools they strike are slightly softer steel. This is to prevent chipping; metal shards chipping off of the hammer or tool. But the end result is that the tool eventually starts to look like a mushroom from the softer metal flowing under repeated blows (much like blacksmithing without the heat).

This mushrooming then becomes very dangerous because the metal curls away from the surface being hammered and big pieces can shear off and become shrapnel. Without appropriate eye and face protection one could be blinded.

So what do you do? Throw out the tool as unservicable? Buy a new one to be safe? The answer is no and no. You redress the striking surface. Here is how.


This picture shows a splitting wedge but these tips can be applied to any similar tool such as a chisel or rock drill. As you can see the top (left in this photo) has begun to curl over. This tool is long over due for a proper dressing.


 This close up shows where two pieces of the metal curling have already chipped off. I had loaned this tool out to a relative and he is inexperienced and struck off center when he was splitting some logs. Luckily no one was hurt by this shrapnel. But when the tool was returned I decided to fix the problem right away.

I have an old bench grinder but you could also use a hand-held angle grinder or even a course file.


Metal File, Bench Grinder, and Angle Grinder

The object of dressing a tool is to remove the unsafe metal and return the striking surface to a smooth, safe configuration.  If you use a grinder you have to be careful to not over heat the metal. Go slow and only grind for a few seconds on each angle. Remove small amounts of metal at a time.


Once you have ground off the curling metal your tool should look something like this. It won't be exactly as original because the tool has been reshaped by the hammering and removal of metal. But you can return the basic profile of the striking surface close to the original. As long as you grind or file off all the excess metal you will regain a usable tool.


Once I grind off the curled metal I like to round off the head so that it doesn't get damaged as quickly in the future. This takes a little practice but you just need to slowly roll the surface of the tool across your grinder.

Good metal tools are not cheap so being able to redress your own tools will save you a lot of money. I have cabinets full of tools that others had thrown out because they could no longer be safely used. I picked them up for free, took them home, and spent a few minutes on each tool to redress them. I have far more cold chisels than I could ever use but I'd rather have more than less. If needed I could sell some of them for a few bucks.

Tuesday, January 22, 2013

Replacing a Broken Sledgehammer Handle

I'm going to expand the scope of my subjects. This is the first.

I grew up working on the family farm and our family campground.  As the only boy in the family of seven, most of the repair and maintenance tasks fell on me. In some cases my dad had shown me how to do these jobs, in some cases I learned by watching someone else do a similar task, and in many cases I was left to figure it out on my own. I have to say my father took it for granted that I knew how to do certain things even though I had never done it before nor seen it done. But I was a clever boy and an even more inventive teenager. I can do basic carpentry, plumbing, electrical, and mechanical constructions and repairs. With the advent of the Internet I have greatly expanded my capabilities. As a result, I have fallen into the same attitude my father had; I presume that most men can do these same types of tasks. 

It fact, most men can no longer do many of these things or they hire others to do them for convenience.  If you have the money you have the luxery of trading cash for convenience and your time. But most of us do not have an excess amount of cash laying around.

Starting with this Post I am going to walk you through maintenance and repair jobs I do, which will save you considerable money if you do them yourself. But if you live near me in Northeast Pennsylvania, you can hire me to do them for you!

Replacing a Broken Handle:

This will be specifically about replacing a broken handle on a sledgehammer but any wood handle can be replaced the same way.


New handle, broken handle, cause of broken handle
How do most handles get broken?  Mostly by hitting the intended target with the handle instead of the metal head of the tool.  In this case a family member was splitting wood with my wedge and sledgehammer and it was broken. Some tool stores will fix it for you but you will then buy the handle, at a premium, and then pay for the labor as well.

How is a wooden handle held into the tool head? By a simple wood or metal wedge.


The channel through the tool head is slightly different on the two ends. One side, the bottom opening, is a straight-sided channel or hole. The other side, the top in this case, is beveled. The bevel is so that the handle can be wedged outward to lock the handle in place. This is done by hammering a wood or metal wedge into the top of the handle and it expands out to fill the beveled space. In my case, the wedge used in the old handle was metal. To remove the old handle you have to remove the wedge.


These two pictures show you what a metal wedge looks like. It is ridged so that it cannot back out of the handle as the tool is used. Wooden wedges are usually smooth and stay in place through wood on wood friction.


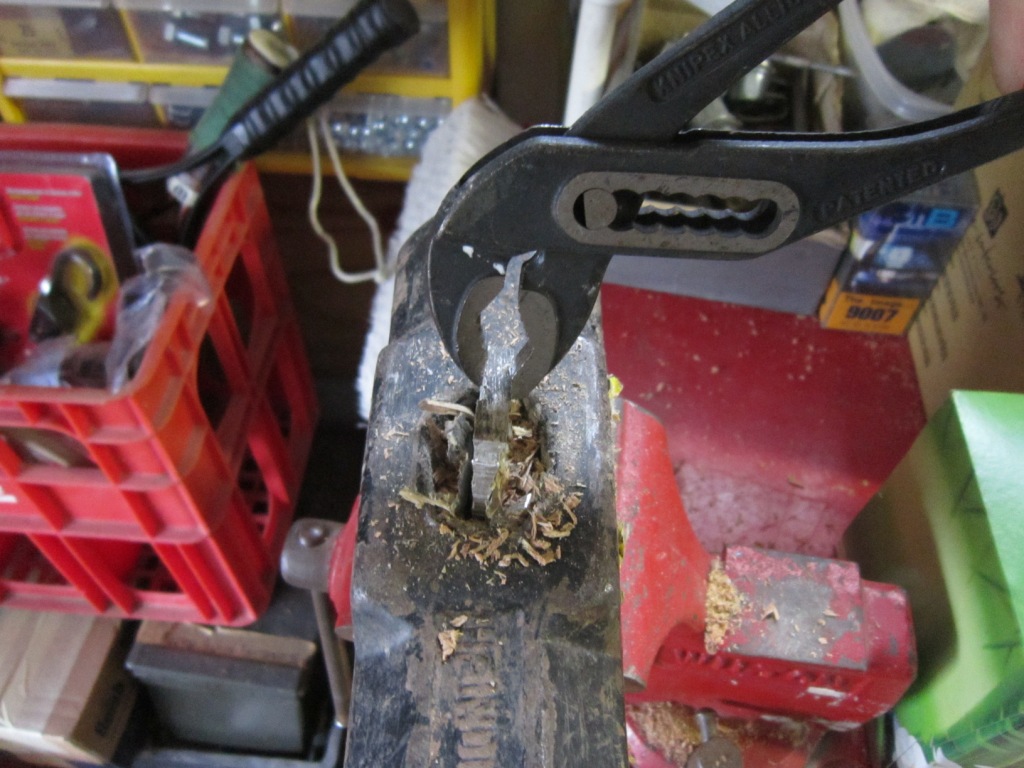
Because the metal wedge is ridged, it has to be freed from the surrounding wood. The best way I have found to do this is to drill several holes on both side of the wedge.


The metal wedges are generally soft metal but you still need to be very careful and precise when drilling these holes. The drill bit can get stuck and suddenly twist the drill in your hand or spin the tool head if you are using a drill press. I use a hand drill but a drill press might be more precise if you are not very experienced. Remove as much wood as you can drilling deep enough that you go below the bottom of the wedge.

Once I have drilled straight down I usually make a couple of passes at an angle to remove some of the wood between the holes.


This is a little hard to see but once you remove as much wood as you can you need to pull out the wedge. I used an old screwdriver to loosen up the wedge and then grabbed it with pump pliers and wiggled it free.


With the wedge pulled out you can now push out the old handle. It will only go one way, down toward the handle side of the tool head. I usually use a blunt punch and a hammer to pound it out of the tool head. Sometimes it is rusted fast or swelled due to absorbtion of moisture and/or oil. But a couple good whacks with a hammer should punch it out.  If not, get out your drill, place a larger bit in it, and completely drill through the full length of the wood.

Once the old handle is out it is time to insert the new handle. Make sure you insert the handle from the un-beveled side of the tool head. The beveled side should be facing up. Place the handle in the bottom of the tool head and then slam the handle straight down onto a hard surface. The weight of the tool head will cause it to drive down the handle as far as it can go. Once you hear a solid sound when you hit the handle on the ground or work bench top, it is as far on the handle as it is likely to go. If you keep driving the handle into the head it will start to splinter.


As you can see, the handle sticks out the top of the tool head. This excess is because these handles fit more than one type of tool and some are wider. This excess must be removed before wedging the new handle. I use a metal cutting hack saw because a wood cutting saw will be damaged doing this.


The handle has a slot cut into it. When you drive the handle into the tool head this crushes together to fit snuggly in the tool head. That slot is where the wedge will be driven. I am going to use the wooden wedge, I usually prefer wood wedges with new handles.


Place the wedge into the slot cut into the handle and carefully hammer it into the handle. Wooden wedges will easily split if you don't hit it square so be careful. Once it is solidly in as far as it will go stop hammering it or you will split the wedge. Cut off the excess so it is flush and then hammer it a few more times to slightly depress it into the handle. When it is cut flush it can't really split so this is safe to do.

You are now done. This is at most a 20-30 minute job and will save you up to $20. Buy spare handles for tools you have on hand when they are on sale or you see a good deal. They don't spoil or go bad. I have handles in my workshop that are over 30 years old and they are as good as new. (I inherited them when I bought the house.)


Wednesday, January 9, 2013

Terra Preta


Certain areas of the Amazon River basin were discovered to be extremely fertile in spite of being in a tropical rain forest area. Tropical rain forests typically have very poor soil because the nutrients are continually leached out by the heavy rains. Why the big difference in these specific areas? The secret is a soil type called "Terra Preta". Terra Preta is artificially amended soil; amended primarily with charcoal. Today we call this amendment "biochar".


What is Terra Preta and Biochar? Biochar is any organic, carbon-based material such as wood, paper, reeds, etc. that is heated in a low oxygen environment until it is carbonized. Charcoal has been made for centuries in outdoor pits filled with wood, lit on fire, and then covered with clay. Today it is cleaner and easier to make it in closed containers (with a small opening to release the flammable gases). Do a Google or Yahoo search on making charcoal if you are interested.


If you have a wood stove, fireplace, or fireplace insert you likely end up with lots of ashes and what do you do with them?  Ashes are good for your garden soil in certain circumstances.  Wood ash can be useful in home gardens, in your compost pile or as a pest repellent.  Wood ash can be a valuable source of lime, potassium and trace elements. Since wood ash is derived from plant material, it contains most of the 13 essential nutrients the soil must supply for plant growth. When wood burns, nitrogen and sulfur are lost as gases, and calcium, potassium, magnesium and trace element compounds remain. The carbonates and oxides remaining after burning are valuable liming agents, raising pH, thereby helping to neutralize acid soils. Ash from a cord of oak meets the potassium needs of a garden 60 by 70 feet, he said. A cord of Douglas-fir ash supplies enough potassium for a garden 30 by 30 feet. Both types of ash contain enough calcium and magnesium to reduce soil acidity (increase soil pH) slightly. In compost piles, wood ash can be used to help maintain a neutral condition, the best environment to help microorganisms break down organic materials. Sprinkle ash on each layer of compost as the pile is built up. Ash also adds nutrients to compost. If used judiciously, wood ash can be used to repel insects, slugs and snails, because it draws water from invertebrates' bodies. Sprinkle ash around the base of your plants to discourage surface feeding pests. But once ash gets wet, it loses its deterring properties. Continual use of ash in this way may increase the soil pH too much, or accumulate high salt levels harmful to plants.


You probably find some charcoal in your ashes too. Charcoal has some interesting properties for improving your soil. Charcoal, finely ground, when added to your soil will hold large amounts of nutrients and moisture.  Charcoal is a fine-grained, porous black carbon, generated from plant materials heated or "burned" in a low oxygen environment. It is non-toxic to plants and people if made from clean, untreated wood. There are many tiny pores in charcoal and the pores will allow air to diffuse into the soil. Plant roots need the air to breathe. The tiny pores will hold water and nutrients and later supply them to plants. More important, unlike other organic fertilizers, charcoal is very stable and it will not decompose to carbon dioxide. So once applied, it will stay in soil for hundreds to thousands of years. The high stability and porosity make charcoal a better fertilizer than most other organic materials.


How much do you want to incorporate into your soil? The general consensus is about five percent by volume. That is far more than you think. So adding small amounts accidentally produced in your fireplace is not going to improve your soil very much, but over time the soil will get better and better. You'll probably need to intentionally produce larger amounts if permanently improving your soil so that you can produce more food is your goal.


I installed a fireplace insert last weekend so that I can partially heat my house with the abundant wood on my property. At the end of the evening I generally close the damper on the insert and that chokes off air to the fire box; this produces charcoal. I will be adding this to my garden all winter long and see how much biochar I can get incorporated into the soil. If it is not as much as I want I will attempt to produce more charcoal using a burn barrel.

Saturday, December 22, 2012

Your Garden in Winter

Due to my Permanent Change of Station (PCS) move and the whole hassle of setting up a new house and starting a new job I took a long break from this blog. I'm ready to get back to it now.

We are well into December (and survived the supposed end of the world) but most of the US has not frozen over yet so I'm going to get back to the subject of gardening. I do a lot of work on my gardening program in the fall and winter.

As some of you know I was living in The Netherlands for the past three years. Before I moved there I put my garden space into caretaker mode. In the late summer of 2009 I cleaned up my garden and roto-tilled everything under. Once that was done I hauled in two F250 pickup truck loads of wood chips. I got these for free at the county conservation center. These wood chips were mostly pine, which tends to attract ants. But while that might be a problem for an active flower bed it was no problem for my use. The idea was to bury my garden under six inches of wood chip mulch to prevent, or at least decrease, the weeds taking over the garden.

This photo shows my garden in late September 2012.  After three years the wood chips rotted down to just a thin surface layer and weeds were starting to get a foot hold.  The planting boxes contain two year old saplings of willow and poplar. I started them from hard wood cuttings when I trimmed a willow and poplar tree on my property. I now have six of each tree and I will plant them in early spring 2013 as part of a wind break on the west side of my property.

This garden is twelve feet wide and forty feet long, which includes the two raised-bed planting boxes and the blueberry bed at the far end. There is also a very productive Raspberry bed on the north side of the garden and an empty strawberry bed on the far side. I hope to plant strawberries this spring, which will give me berries in 2014.  Over the past ten years or so I have incorporated several tons of compost, leaves, grass, and wood chips into the soil. It is very fertile although after three years of dealing with high carbon wood chips I know the nitrogen level is now very low.

In past years I have provided nearly all the fresh vegetables needed by three families during the growing season. This coming season will be the first time I have been able to work in the garden every week instead of only one or two weekends a month. It should be good.


So, getting back to the garden. Here is a close-up of the bed. As you can see there is not much left of the mulch cover and weeds are poking up here and there. After this picture was taken I ran the roto-tiller over the garden three times at 90 degree angles to fully incorporate the composted wood chips, the occasional weed, some wood ash, and the thin layer of undecomposed wood chips. The soil was absolutely full of worms, which is always a good sign.

I don't have a picture, but will get one soon, of how the garden looks now. After I tilled the soil under I used my DR Leaf and Lawn Vac to collect freshly cut grass and fallen leaves. If you have a large yard, the money to buy one, and the covered space to store one, I highly recommend these towed-behind vac systems. I happen to have a DR model (an older model which they have since discontinued) but there are several other optins out there. I have had some issues with my DR such as the tube clogging constantly and I needed to have the carb rebuilt this past year. But otherwise it has been a great tool to clean up the yard and provide literally tons of free mulch and feed-stock for my composting center. It looks like the new DR models have fixed some of the things I least like about the one I own. But they are expensive and I don't think I will replace it until it is completely unusable.

The reasons I buried my garden again are:
    1. I never like to have raw soil exposed to the elements. Wind and rain will remove soil and nutrients very quickly.
    2. I need to get nitrogen into the soil because the microbial action of breaking down the wood chips used up most of this vital nutrient. Grass is very high in nitrogen. The leaves bring lots of trace elements and minerals to the soil.
    3. The six-eight inch layer of grass and leaves will insulate the soil, keeping it above freezing, long into the winter. This will allow the worms and microbes to continue breaking down organic matter and continue to build my soil.
    4. Weeds grow even in the winter.

While it might be winter with cold, blustery days, my garden is still hard at work.

I do not endorse any commercial products. I do occasionally present my observations. Below is a small list of companies that provide lawn vac systems. Read and research before making a purchase.

DR Power tools

Cyclone Rake System

Billy Goat equipment

Agri-Fab equipment

Swisher system

Trac-Vac equipment (Probably the biggest selection of options at one company)

I have also used a motorized Leaf blower/vacuum in the past and it did a real good job sucking up and grinding DRY dead leaves. They were chopped up into tiny bits and were great mulch and soil amendments. I emphasized DRY here, they machine I have has a plastic fan/chopper blade and can only handle dry, dead leaves. Some of the newer, more powerful models might do more. Check out this advertisement for an example. Mine is a Sears model from at least 15 years ago and it still works great.

Saturday, May 5, 2012

It's Spring - Where to Start?

I just got back from a much needed vacation so it's time to get caught up here.

Because of the generally warmer than usual winter in the US, you are in late Spring in many places. Here in The Netherlands it was unusually cold but the Spring is pretty much right on schedule.What should we be doing now to continue saving food dollars and put good food on the table?

1. Foraging: Hopefully last year was your learning year and this year you did some foraging for early Spring greens. The more I learn about dandelion the more impressed I am with that edible "weed". Dandelion greens are one of the most nutritious greens you can eat. (Of course, you have to be careful to ensure wild greens of all sorts have not been contaminated with pollutants from roads or sprayed with pesticides or herbicides in parts and other public areas.) Ounce for ounce, they have more calcium than milk and as much iron as spinach. They are also a strong source of beta carotene, vitamins B, C, and E, fiber, magnesium, potassium, and iron. Dandelion greens have been used in folk medicine for all sorts of maladies but I don't want to get into medicinal properties of plants; that's a whole other subject. In the North East where I come from, common wild plants for foraging are: Pigweed, Cattail, Lamb’s Quarters, Plantain, Garlic Mustard, Wintercress, Black Mustard, Evening Primrose, Dandelion, Chicory, and Fiddlehead Ferns. Last Spring I talked about a couple of these; some I have experience with and some I do not.

2. Gardening: Depending on where you live you should already have some things planted in your garden and other plants started in trays indoors.

Have you planned your garden yet? It is not too late. I always draw a diagram and plan my garden on paper. Truthfully, I don't ever follow the plan exactly but it does give me a good starting point and a general plan. I prefer to grow food plants in linear raised-beds. Mine are generally 3-4 feet wide and 8-16 feet long. So drawing up a planting plan is fairly simple. In these beds I plant intensely using elements of "The Square Foot Gardener" methodology. These are wide-beds or block plantings.

Why do a plan? There are several purposes to a garden plan.

    1. Allocate space for what you want to grow. If you just start sowing seeds or transplanting plants into the garden bed you will quickly run out of room. It is very easy to over plant one type of plant and then have little room left for others. 

    2. Determine if you can grow successive crops or inter-plant crops. Some crops grow fast and can be harvested early, such as radishes. Radishes have a 30-40 day life cycle in my garden. So I often inter-plant them with other slower growing plants. The radishes grow and are harvested long before the other plants have grown enough to use that space. Since radishes grow fast and then are picked, they also open up space for second and third crops in the same location. Peas are much the same. peas are an early season crop that will be harvested before the end of June and the you can use that space for another vegetable. Peas also add nitrogen to the soil to help the second crop grow better.

    3. Ensure you are planting plants that tolerate or benefit each other next to each other. "Companion" planting was well known by our farmer ancestors but was a lost art for a long time due to the adoption of commercial "long row" growing techniques by most growers.

Row Gardening
Wide Row Gardening


With long rows, all the same plants are growing in long lines separated by bare or mulched soil. This is done to make it easier to use motor-driven rotary tillers or cultivators to keep down the weeds. In wide-row or block gardening, plants are bedded close to each other creating a "living mulch", which will also keep weeds to a minimum. But you have to ensure that neighboring plants are compatible. The chart at this website LINK is as good as any I have seen. Circles indicate plants that help each other and an "X" indicates two plants that inhibit or harm each other. On the right is a guide that shows which plants will help curb insect problems in your garden.

    4. Crop Rotation: Crop Rotation is important to reduce plants disease and insect problems. You should always try to avoid planting the same type of plant in the same space in succeeding years. Plant disease and insect eggs from one years crop will attack that same crop even more strongly in the second year. To avoid this problem, plant something different there that the disease or insects cannot harm. Also, some plants strip most or all of certain nutrients from the soil. So in the following planting, it is important to plant something that doesn't need much of that nutrient OR adds that nutrient back to the soil. All legumes (beans and peas) can add nitrogen back to the soil if the seeds are inoculated properly.