Wednesday, October 23, 2013

Shopping the Dollar Stores


Live Off the Dollar Store for a Week on a $50 Budget

By Tahirah Blanding, Cheapism.com

College, unemployment, or an unexpected change in your life situation can mean learning to live off the dollar store. These are times when a major cut in spending is required as you plan how to survive from week to week. We found that it's possible to take care of the essentials, with a dollop of comfort thrown in, for less than $50 a week by shopping at the local dollar store.

Sure, the dollar store is a pit stop for cheap snacks, cooking supplies, toys, and other small items, but it's also a source for food at one very low price. And yes, there may be a stigma attached to dollar store shopping for all your needs, but it's time to get over it.

These super-discount chains can sell items cheaply because they follow a strategy that involves buying non-brand items that aren't backed by enormous advertising budgets, stocking items in smaller sizes, and buying products in bulk from companies that are going out of business. Most goods sold in dollar stores are perfectly fine, and you'll often find reputable brands such as Minute Maid, Del Monte, and Suave. Do shop wisely, however: Some items, such as electrical products, may be knock-offs that don't meet quality standards. A few dollar stores now sell meat, so be sure to carefully inspect the packages, just as the Ohio Department of Agriculture suggests.

Dollar store product generally come in smaller sizes than items sold at retail grocery stores, but the small servings still suffice for the average person (most dollar store food items serve at least one). Dollar store cereal, for example, typically comes in boxes that serve at least four; oatmeal in individual packs of six; small bags or boxes of pancake mix that serve up to 11; instant coffee that can make up to 50 servings. About 30 products used in various combinations for breakfast, lunch, and dinner (with a snack here and there) would cost less than $50 and keep you going for a week -- and then some.

A dollar can go a long way.

Breakfast for seven days would cost about $10 using combinations of coffee, apple juice, oatmeal, bread, eggs, milk, cereal, pancake mix and syrup. Outlays for lunch and dinner foods would total slightly more than $30 and involve mixing and matching tuna, pasta, frozen meat, premade pizza crust and sauce, canned soup and vegetables, etc. Our suggested menus and shopping list presume you have some staples on hand, such as mayonnaise and condiments like pickles.

Below are a suggested dollar store grocery list and menu for a week. Most of these items are sold in-store, but inventory varies at every dollar store.

Menu:
Breakfast
Day 1: Bowl of oatmeal, coffee
Day 2: Pancakes, coffee
Day 3: Bowl of cereal
Day 4: Toast with jelly or peanut butter, scrambled eggs
Day 5: Waffles, coffee
Day 6: Bowl of cereal
Day 7: Bowl of oatmeal, cup of apple juice

Lunch (accompanied by water or iced tea)
Day 1: Tuna salad, potato chips
Day 2: Soup, crackers
Day 3: Hamburger Helper, canned vegetables
Day 4: Pizza
Day 5: Tuna pasta salad
Day 6: PB&J sandwich, granola bar
Day 7: Soup, crackers

Dinner (accompanied by water or iced tea)
Day 1: Spaghetti, canned vegetables
Day 2: Mashed potatoes, barbecue chicken, canned vegetables
Day 3: New Orleans-style rice, beans
Day 4: Tuna pasta salad, canned vegetables
Day 5: Pizza
Day 6: Hamburger Helper, meat
Day 7: Tuna pot pie

Snacks
Granola bar, toast or crackers with peanut butter, jelly
1 box cereal - $1.00
1 6-ct pack oatmeal - $1.00
1 bag coffee - $1.00
1 loaf bread - $1.00
1 box pancake mix - $1.00
1 bottle imitation maple syrup - $1.00
1 jar jelly - $1.00
1 jar peanut butter - $1.00
1 12-ct. carton eggs - $1.00
1/2 gallon shelf-stable milk/1 gallon fresh milk - $1.00
1 32-oz. jar apple juice - $1.00
1 2-ct. pack premade pizza crusts - $1.00
1 jar pizza sauce - $1.00
1 container grated parmesan cheese - $1.00
2 boxes Hamburger Helper - $2.00
1 bag pasta - $1.00
2 cans meat sauce - $2.00
5 5-oz. cans tuna - $5.00
1 box instant oatmeal - $1.00
3 1-lb. cans soup - $3.00
4 10-oz. cans vegetables - $4.00
1 box crackers - $1.00
1 pastry crust - $1.00
1 box New Orleans-style rice - $1.00
1 can beans - $1.00
1 bag potato chips - $1.00
1 6-ct box granola bars - $1.00
1 bottle barbecue sauce - $1.00 Total: $43

Save money by following these tips.
Plan out meals, rather than snacks, and purchase items that can be used in at least two different meal settings; bread and eggs work for breakfast and lunch, for example, and tuna and soup do double duty for lunch and dinner. Some dollar stores contain a frozen foods section (the Dollar Tree, for one, recently began installing freezers) stocked with items such as meat and TV dinners, and some have a refrigerated section filled with dairy products. Canned and boxed goods dominate dollar store shelves, however, so fresh fruit and vegetables will have to be put on hold.

Living off the dollar store requires careful planning and discipline. Make a list of your needs (and commit to sticking to it) before setting foot inside. Avoid the non-food aisles. All too often a quick browse down the wrong aisle can lead to an impulsive choice of something that seems essential but under the circumstances just isn't. After purchasing all the necessary food stuffs, you may have a few dollars left over for a 6-pack of tissue or a stick of deodorant. Some dollar stores accept manufacturer's coupons, so don't be shy about checking the store's policy. Saving a few extra cents here and there adds up to dollars that can be allocated towards other expenses, such as bills or transportation.

Tuesday, October 15, 2013

Self-Help Postings

I will list all my self-help postings here so you can access them easier. Just click on a link.


Cutting firewood for heat 

Splitting Firewood safely

Building a Cheap Woodshed from Pallets

Replace a Tire Valve (one hour for two)

Build a Small Cold Frame

Dressing Metal Tools

Replacing a Tool Handle

Making Jelly

Composting - My Results

Fast or slow composting Part-1

Fast or slow composting Part-2

Fast or slow composting Part-3

Replacing a Tire's Valve Stem

This is another of the "How To's" to help you save money and learn how to be more self-sufficient. If you have been reading my blog for the past couple years then you know that I am an organic gardener and that I use the material from my property to produce compost and also to put my garden to bed each fall.  So Saturday, three days ago, I was planning to cut my grass and at the same time vacuum up the fallen leaves and pine needles with my DR Lawn Vac system. When I hooked up and pulled it out of my equipment shed I noticed that the tires were flat. So I towed it to my garage to pump up the tires. I filled one tire and went around to fill the other. By the time I returned to the first tire it was flat already. I refilled the tire and put my ear close and heard air hissing out the valve stem. 

So I pulled the tire off and pushed the valve stem with my finger and it snapped off. Apparently it had dry-rotted. What to do what to do? My first inclination was to take both tires over to Walmart and have them fix it. Taking a look on-line I found I could expect to pay $5.00 to $10.00 per tire on the low side and up to $20.00 per tire on the high side. Wow, too much for me. So I thought I would give it a try myself.

I drove over to the local AutoZone and not surprisingly found that there are several sizes of valve stems. Luckily I brought the broken off section and could match it up with the right size. This pair only cost $2.99 and the instructions are right on the back.

The first thing to do then is to deflate the tire if it isn't already, not an issue here since the valve stem broke off. Then you have to break the bead. The bead is what seals the tubeless tire onto the rim. I used a pry bar turned at an angle and then my weight (200 lbs) to break the bead seal. Once any section comes loose, the whole thing sort of peels off the rim. It took me some time to get the broken-off inner part of the stem out of the tire.

Once the old stem is out you can place the new stem in the hole from the inside of the rim. 


I lubricated the stem with a little saliva and with one hand I pushed from the rear and with the other I pulled and wiggled it back and worth until the flanged seal popped through. It was not too hard at all. I made sure the valve was seated evenly and fully sealed all around the base of the stem and then inflated the tire. Everything sealed up properly.

Once it was done I remounted it on the Lawn Vac and then did the other side, which wasn't leaking but why not do both at once? 

This was a simple enough job that saved me somewhere between $10 and $40 had I taken it to a garage. It took me no more than an hour to complete, not too bad for a first time.


Wednesday, September 18, 2013

Eating Cheaply While at a Conference

A week ago I attended training at Carlisle Barracks in Pennsylvania. At the lunch break I spent over $10.00 for a tasteless, un-filling, and certainly not healthy lunch. That wouldn't do. So that night I went to the Weiss market in town (I have a Weiss shopper's card) and bought supplies to provide my own lunch.

For a little over $12.00 I bought three rotisserie chicken breasts, a block of Sharp Cheddar cheese, canned fruit, a half loaf of all-grain bread, drink powder, and cookies. This, supplemented with some items from the hotel breakfast bar fed me quite well for the rest of the week. This saved me at least $28.00 and was much healthier and tasty.

My room had a refrigerator and a microwave so I also bought food for supper. I carried the same insulated lunch bag that I use for work with a small ice pack that I refroze every night.

Every little bit helps...

Monday, September 2, 2013

Garden Excess - What to do

Most decent gardens eventually produce more than you can possibly eat at the time; mine is no exception.  So what do you do with the excess vegetables that you can't immediately eat?

1. Give some away: I keep my in-laws pretty well supplied with cucumbers, tomatoes, and green beans. They appreciate the fresh, organic produce and I get some "brownie points" with my wife's family.

2. Freeze:  I freeze prepared green beans to eat later. Since my kids don't eat them I freeze them in "two-portion" size bags. I put the date on the bags so that I eat them "first in first out".  I picked out the beans that were a little too ripened to eat plain and cut them up for soup ingredients. I make a lot of soup in the winter.

3. Pickle: I have made conventional pickles several times in the past but this year I just don't have the time to do it. So I tried a couple short-cuts.

    a. I sliced up cucumbers, Hungarian banana peppers, and onions and dumped them into a pickle jar. I saved the jars and pickle juice from three different flavored pickles I had bought. Now I have to say here that no respectable canning guide or food expert will recommend that you do this. But I have done it many times successfully. Make sure all the vegetables are fully covered and at least twice a day give the jar a good shake to mix the juice around the veggies. Give the mix at least a week and you'll have some nearly free pickled vegs.

    b. Onion and cucumber salad. This is an easy recipe: I  use two thinly sliced cucumbers, one thickly sliced onion (a large one or two small ones), and a thinly sliced pepper. Mix together one cup of apple cider vinegar, two cups of cold water, a half to one cup of sugar (to your taste), salt and pepper to taste, garlic if you want. Mix the vegetables in a large bowl and the pour the liquid over the veggies. Cover the bowl and refrigerate. You can start eating the mix after a couple hours but I like to wait at least a day. You can store this in the fridge for a couple weeks but mine never lasts that long (I eat it every day).

4. Dry: I dry my onions, which then lets me store them for maybe 2-3 months. I grew 50 onions and have eaten ten or so of them so I'll dry the rest and store them in mesh bags hanging so they get good air flow. I have dried excess tomatoes in the past using a food dehydrator. Then I crumble them up and add them to dishes when I am cooking. It adds a hearty, tomato flavor to any dish.  M<any people dry beans but I never have. I don't eat dried beans very often, though I do add them to soups, and I would rather eat the beans green. Maybe next year I'll grow some to dry since I did have a big open area in my garden this year.

5. Store in a "Ground Cellar": I haven't harvested my potatoes yet but I will have a pretty good crop I think. Most of your root crops can be stored in a cool (almost cold), dry space. I have an unheated cellar so I will select the best, unblemished potatoes and store them there. Properly prepared, potatoes will easily last 3-4 months and then they tend to start sprouting.

Friday, August 23, 2013

My Garden 20 August 2013

My garden keeps putting out bucket after bucket of fresh, organic food. Weeding is not much of a problem since the vegetable plants cover most of the ground. 

I planted a second smaller patch of green beans a couple weeks ago and they are doing very good. At the same time, I just picked a gallon of green beans from the original patch. If you picked early and often the plants will continue to produce but at a slower rate. This picture is actually from two weeks ago, before I left for my camping trip. The patch is completely filled with flowering plants now. I should start getting beans from these plants in about two weeks.


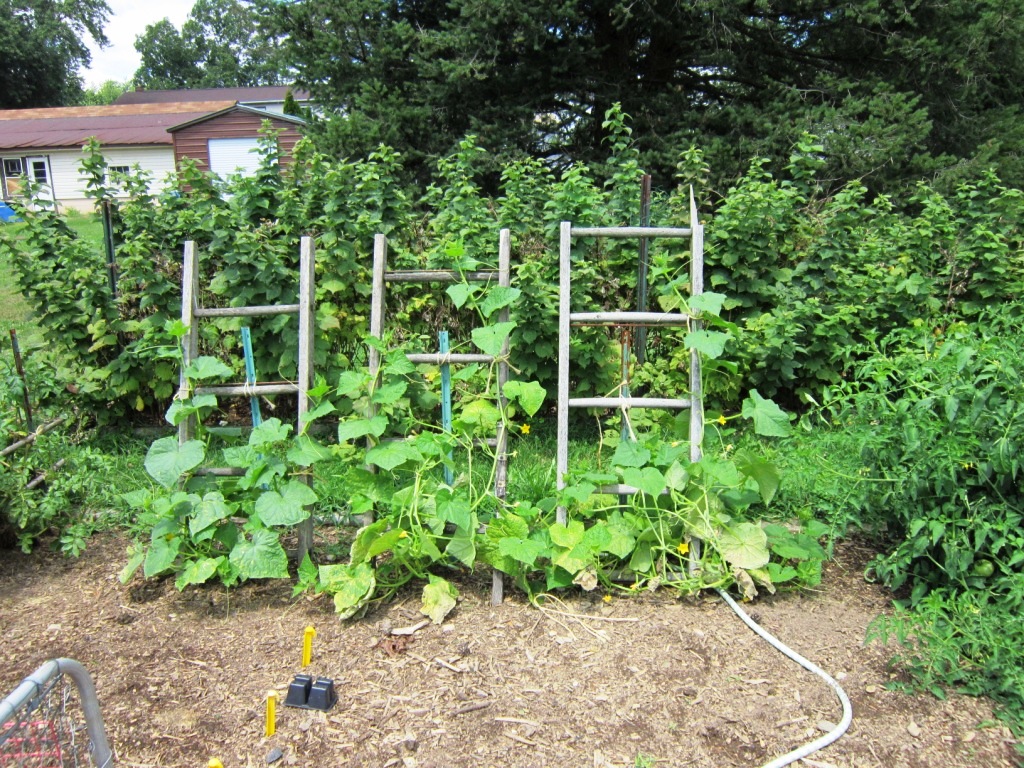
I have already picked seven nice cucumbers from these vines. I trained them up three ladders to save ground space. I have always raised my vine fruits above the ground. They stay cleaner, have less pests, and it is easier to see the fruits.
 
This picture shows the last of my fifty onions still in the ground but they are all picked now. For best storage you should always wait until all the foliage is brown and the bulb is loose in the ground. Then, set them out where it is dry with the roots facing the sun and any breeze you have. It is important to dry the roots quickly to stop growth. That takes about 3-5 days. Once that is done the bulbs need to be further dried on all sides. I usually use some sort of screen or net so that warm dry air can get to all sides of the bulb.  Dry them this way for two weeks and then put them away in a cool dry place and they will last for weeks.

The three blueberry bushes got completely out of control. We picked about four gallons of berries and they just kept coming. I will prune these bushes back hard this winter to make them more manageable and easier to work around. If I had been home more than on the weekends I could have picked at least another four to five gallons of berries. I opened up the netting and let the birds have a feast.


My strawberries produced a bowlful of berries, very tasty too. But the main activity this first year is to send out runners and produce "daughter plants".  In this way, you can triple the number of plants you have for the next year, the main year for producing berries. This is an earlier picture, the bed is now full of new plants. The plants will do this with no help but I find it useful to place the daughter plants where I want them, properly spaced apart, and held in place with small twigs stuck in the ground.

I got peaches for the first time in five years. My father-in-law had planted this tree at least 15 years ago and it did well for him in the early years. But it was over grown and plagued with pests and hasn't produced full-sized fruit in many years. Last winter I pruned it pretty hard but you should never remove more than one third of a tree's branches in any given year. This winter I will cut it back some more and give it a more "open" form. Peaches need to be open on top for sunlight and air flow. So hopefully next year it will do even better.

This has been a good year for my garden.  I have plenty of produce, berries, and cut up peaches in my freezer to feed me later in the year. I should probably harvest my potatoes in about two or three weeks. I am expecting at least a bushel from the ten seed potatoes I planted. The foliage is huge and must have been feeding the tubers (fingers crossed).

Tuesday, July 16, 2013

My Garden 13 July 2013

I missed a couple weeks blogging my garden so here is a catch up.

In the past couple weeks I have picked:
         one and a half gallons of green beans
         one gallon of blueberries
         three quarts of raspberries
         23 radishes
         7 spring onions
         lettuce and spinach
         one Hungarian pepper


The three blueberry bushes I have are out of control this year. Winter and spring weathe must have been near perfect. We have already picked a gallon of berries and there are still twice as many on the bushes. I do not eat blueberries but my family does so we are freezing them in two cup incriments for later baking.


The green beans are fully mature.  Two weeks ago I noticed that something was eating the plants; all the tips were nipped back. Both rabbits and groundhogs love beans and bean plants. So I brought my new .22 rifle up from the gun locker and allowed it to warm up (my basement is always cold). The next morning I quietly crept out to my garden area and there was a young groundhog. I made a standing head shot at 30 meters; no more groundhog.  I'll eat groundhog, as I have mentioned way back in  previous blog post, but I didn't think my wife was ready for me cooking down a groundhog in her crock pot this particular day. So instead, it became worm food in my compost pile.


My tomato plants are doing good and there are many small, green tomatoes forming. I buried them deep and my soil is rich so they should produce a good crop. My dad's tomatos, three miles west of my place, are showing some early signs of disease. Hopefully it is not moving down the valley and I will have to be sure to avoid those plants.


My peppers and onions are also doing great.  The onions are very large and strong smelling so I'm hoping they will be sharp and powerful tasting. I have two bell peppers and two sweet Hungarian peppers.  All four have young fruit on them.  I ate one Hungarian pepper in salads last week and it was very tasty. I have not tried any of the onions yet.
I planted six old, (at least five years old), cucumber seeds two weeks ago. Five seeds germinated but it appears that one was eaten. I was only going to grow three plants anyway so this is fine. I obtained the three ladder sections from a neighbor's burn pile. I always grow my cucumbers up off the ground. This takes up less space and keeps the cucumbers cleaner and away from slugs and other ground critters. The fruit grow straighter and are more visible hanging from the vine.


My new strawberry patch is doing okay but not great. I planted 24 plants, there were supposed to be 25, and several died off. Luckily, strawberries send out runners with "daughter" plants growing from them. I am manually locating the daughter plants to fill in the gaps and to keep them from getting too close and crowded, a common problem. You can usually triple the number of plants you have by doing this correctly. You would have  look real closely to see that I use tiny twigs stuck in the ground and crossed over he runners to hold them in place where I want them. I also expose the soil under the daughter plant so that it can root more easily.

Lastly, I have replanted radishes and spring onions in my cold frame. I raised it up off the ground with a brick at each corner and replaced the plastic lid with a mesh lid. This will increase air flow, keep the temperature lower, and partly shade the plants. They are both cool season crops so I am hoping this will allow them to grow properly in the heat of the summer. We shall see...


As you can see there are very few weeds in my garden. I do pick some weeds each weekend but my tillage techniques and close cropping of plants to shade out the soil prevents most weeds from starting. The grass mulch I put down also helps quite a bit.