Sunday, June 26, 2016

Ethanol - Destroying your Small Engine?

Well, it might not destroy it but it will definitely damage parts of your small engine. I have a considerable number of gas operated machines to take care of my property. Most of them I inherited, I could never afford to buy all these yard machines. But since I have them I use them and maintain them. My goal is to make them last my lifetime or at least as long as possible. Each spring I change all the filters, change the oil, lubricate anything that moves, sharpen the blades, tighten bolts, weld any breaks or cracks, and touch up paint where it is needed. I do this as needed during the season it is used, and then winterize everything in the fall. I drain any unused fuel and run the motor until the carburetor is dry.

Even so, I have had to take various pieces of equipment to the shop because the carburetor was gunked up or because the fuel line failed. I took my trusty old Sears Craftsman chain saw in to get a new fuel line in March and it cost me almost $80, most of that being labor. A brand new saw from Sears is only $189. So when my leaf blower fuel line collapsed in the fuel tank I decided to try and fix it my self.

First off, what is happening to the fuel lines? Ethanol fuel has varying percentages of Ethanol, an alcohol mostly made from corn in the United States, mixed in with the gas. (Ethanol 85, or E15, is 15% alcohol.) The Environmental Protection Agency has approved gasoline with 15 percent ethanol for use in cars year 2001 or newer, but it prohibits its use in mowers and other power equipment, stating it may cause damage. A Department of Energy study found that E15 caused hotter operating temperatures, erratic running, and engine-part failure. Did you know that? 

Alcohol and gasoline mix better than water and oil but they don't mix perfectly. And alcohol has some properties that are not really healthy for gasoline motors. For one thing, it attracts water and if you try to store Ethanol gas for any length of time you will get moisture in the fuel. This greatly degrades the energy output of the fuel and causes rust. 

"Ethanol has inherent properties that can cause corrosion of metal parts, including carburetors, degradation of plastic and rubber components, harder starting, and reduced engine life," says Marv Klowak, global vice president of research and development for Briggs & Stratton, the largest manufacturer of small engines. "The higher the ethanol content, the more acute the effects." Servicing dealers are reporting similar problems, even with E10, according to the Outdoor Power Equipment Institute, the industry's trade group.

But what happened to my fuel lines? They were dissolved by the alcohol. Below is what was left of the fuel line to my leaf blower:


The plastic tubing was brittle and crumbled in my fingers. The dark piece of tube on the left was the line going into the fuel tank and the bits and pieces and longer piece on the right were inside the fuel tank. If you look closely at the longer piece on the right you will see dozens of tiny cracks in what is supposed to be flexible tubing. 

So I took off the outer casing of the left blower, five star-head screws held it on, and the fuel tank just had a pressure fitting holding it on. The fuel line fell apart so there was no need to remove it but I did have to get all the bits and the fuel filter out of the tank.


I bought a two-line pack at Lowes but you could get it at any hardware store. I had no idea the size of the fuel line so I bought a pack with the two most common sizes. If I have to do this again I'll look up the fuel line size on the Internet but I was over in town for another project and I didn't want to go home and then come back later.

Installation was easy enough. I squeezed the tubing through the hole in the side of the fuel tank.
Then you have to run enough through so that you can attach the weighted fuel filter.
Then pull the tubing back until the filter rests on the bottom of the tank. Once that is done attach the fuel line to the carburetor or splicing point, whatever you removed the old fuel line from.


 With my new fuel line installed I filled the tank with fresh fuel, pumped the primer a couple times, and stated the motor. It ran like a champ and only cost me $2.89 for the parts. That is a big savings!

As of March I now only buy non-Ethanol gasoline, which in my area means I have to pay for Premium gas (91 Octane). It is about 60-80 cents a gallon more expensive than Regular Unleaded and I have to drive 25 miles to get it but I also buy my "Off-Road" diesel there so I try to time my fuel runs to get a couple cans of various fuels at one time.

Wednesday, April 27, 2016

Cutting Timbers

This is another post that is not directly food related but is a Homesteading skill you might want to learn.

There is yet another blight going through my area killing off Blue Spruce trees. A few years ago I lost about twenty White Pines on the property. These were all trees planted as Christmas Trees by my wife's grandfather about sixty-seventy years ago. They were huge and a lot of work to cut down, de-limb, cut up and split for firewood, and burn all the branches. Now I am doing the same with seven, so far, huge spruce trees.

The trunks were fairly straight and 18-30 inches in diameter. I thought it would be a huge waste to cut these trees up for firewood. So I went online and ordered a Granberg Chainsaw Mill through Northern Tools. You can view the mill in action at: Mill

I was just experimenting today and used the worst of the logs I had. I didn't take pictures of the process, unfortunately.  The Mill took about thirty minutes to put together; the instructions were more than adequate. I didn't buy the Mill Rails that the company wants to sell you, I used a 2x6x10 that I had in my shed. I can see how the rails would make the job easier and the cuts straighter.  

I used four inch deck screws to secure the 2x6 on top of the log. I adjusted the depth of the cut to try to get the largest timber possible. As it turned out, I was able to produce a 6.5x9 inch timber. 

The saw I was using is an old Sears Craftsman 18" chainsaw that I recently repaired and got back into use. It is woefully under powered for milling but pine is soft and I had all the time I needed. It also does not have the recommended ripping chain and bar, I used the standard crosscut chain and bar. I did have trouble keeping the saw running, it kept stalling out, but otherwise it did a surprisingly good job.

Here is the result:


I have to say that the process is pretty easy if you are experienced using a chainsaw, take your time, and let the saw do the work. I have no intended use for this timber, I just wanted to try out the mill. 


I made the top and bottom cuts with the Mill but cut the sides free hand after scribing a line down each side. I am quite happy with the results and know that with more experience I will be able to turn out some good planks and timbers. 

The Mill is plenty fast enough to cut some planks and timbers for projects. With the correct saw, chain, bar and maybe putting the log up on a platform, you could produce quite a bit of almost free, usable wood. It took me about 30 minutes to cut this timber and it was my first attempt with an under-powered saw. I think I could cut the timbers for a cabin, shed, or other structure in a couple days if I had access to the trees. Slab planks would be even easier and quicker for flooring and siding.

This mill is obviously very portable so you could take it into the woods and cut your lumber and timbers on site. That makes the product a lot easier to carry out. The log I started with was a couple hundred pounds. This timber was about 125lbs, which I can easily carry. 

I used about a tank of gas to produce this timber; that's about a cup and a quarter of oil/gas mix. That is not too bad.

I cut up the four slabs cut off the outside of the timber for fire wood. I will run the bark through my chipper/mulcher for high quality mulch. So you really get to use every part of the tree trunk.

If you have access to trees, you can produce good quality lumber with this simple rig. There are fancier mills out there and they might do a better job. But the Granberg Mill is affordable; they are going for $159 at the time of this writing.

If you don't have your own woodlot, you can get trees for free from Craigslist and you can talk to utility companies and tree removal companies in your area. They usually have no interest in hauling out the trees if someone is willing to come and get them.

Saving Frost-Killed Plants

In a previous post I mentioned that my Cold Frame will protect cool season crops pretty well but other plants, not so much. I had two tomato plants and six pepper plants out in the cold frame to harden off and they were doing just fine for several weeks. Then temps dropped to 12 degrees at night. That wasn't what the weatherman predicted though so I left my plants out in the Cold Frame. All but one pepper plant were frost-killed. I left them out in the box though thinking I would have to buy new plants. The original plants were purchased down in Maryland, which weather wise is about 3-4 weeks ahead of where I live in Pennsylvania. No local nurseries were selling plants in my area yet. So I figured I would just wait a couple weeks and start over. 

So this is what the plants looked like a couple days after the severe frost. The plant was fatally burned by the 12 degree night time temperature. But as you can see there is still a tiny bit of green at the bottom of the stem even several days after the deadly night. In my experience, if you still have green, you can still save the plant (if you want to). So I removed some of the dirt from around the green nub so it would be exposed to sunlight. Green means it can absorb sunlight and convert it to energy. I also watered it well. Now, the only reason this plant survived at all is because I transplanted it from the six-pack container I bought it in, to a half gallon pot with the soil mix I talked about before (Sand, charcoal, and compost). This allowed the roots to grow quickly and for the plant to produce and store energy.


After a couple days a tiny sprout started growing from the green nub. This is evidence that the plant has enough energy to regrow. This is a very fragile growth though so these pots are going in and out of the garage with the replacement plants that I bought (see previous post). For the first couple of days I only put the plants out in diffused light, not in the direct sun light. I didn't want to sunburn the plants.


As you can see, this plant's sprout has now put out two leaves and will now quickly grow. The roots are good, the soil is good, and it is on its way to being a full plant in a couple weeks. So these plants will be behind the growth curve compared to the new plants that I started but they will still eventually produce peppers and tomatoes that I can process and can. It cost me nothing at all, except a little bit of time, to save a couple plants. 

So if you think you lost your plants to frost, give them a second chance and see if you can recover them. It saves you a bit of money and is satisfying.

1 July 2016 Update: The pepper plant did not recover but the tomato plant did. The tomato plant is now 20 inches tall with a couple flowers on it. I planted it in my dad's garden since he was in the hospital for the whole planting season. We will get some late season tomatoes from this salvaged plant. A 50% success rate is not too bad at all.


Sunday, April 24, 2016

Early Gardening 2016

I live in a place where, in Spring, it is very often down in the teens at night and up in the 40s or 50s during the day. Then the next week it is in the 80s. This makes it very hard to get plants started early; they are either freezing or over-heating. 

I have a small cold frame, I showed how I built it two years ago. It works fine for cool weather crops like lettuce, spinach, radishes, and carrots. I was curious how well it maintains the heat so I put a thermometer in it a couple weeks ago. On a morning when it was 17 degrees outside it was still 32 degrees in the cold frame. Still too cold for most plants but warm enough for others. 


Onions do quite well in a cold frame. I planted these in February. They will be big enough to eat in June. The upturned jugs are filled with water, which warms up during the day in the sunlight and then keeps the ground from freezing at night. I had other jugs of water in the cold frame to absorb excess heat from the sun-warmed box and then give off that heat at night.

I planted some radish seeds in February as well but starting seeds in cold ground is a hit or miss effort. It took three weeks for them to sprout and they really haven't been growing very fast. It is still quite cold at night. But now that the days are warming up I can take the glass off the cold frame during the day and they will start to grow faster soon. I should be eating my first fresh radishes in mid-May.


I bought a six pack of peppers for $1.48. These are small spindly plants coming out of green houses where they were grown under grow lights (usually). I usually buy these when I can find them early in the season or pre-season. Below is a six-pack of Tomatoes just to show the container and the small size of the plants, I forgot to take a picture of my plants when I bought them.


If you wait to buy the plants when they are larger, in quart or half-gallon pots, you will pay about $3.50 EACH! That is a huge difference. So I buy the six-packs and then transplant my peppers and tomatoes into half-gallon pots. I have a nearly endless supply of good compost and charcoal from my winter fires. I mix a batch of potting soil using sand, charcoal, and compost and put my little plants in bigger pots. The plants are already usually Root-Bound and the tiny amount of soil in the six-packs limits their ability to grow. But once you loosen the roots and transfer them to the bigger pots, they restart growing. I puts the pots in trays and take them out during the day and bring them into the garage in the evening so they don't freeze. Once all danger of frost has passed I will plant them in the garden. I do this pretty much every year and it saves me a lot of money.


This will give me a head start on the growing season and put food on the table when most people in my area are just getting their garden started. Oh, I almost forgot, I planted four short rows of green beans under plastic two weeks ago and a few of them have sprouted abut have no yet broken the surface of the soil. Next week I will post a note on how I start my beans in my early season garden.

Friday, April 22, 2016

Dandelion Foraging Season

We are about a week or two into the Dandelion picking season. You can pick them all summer really but the earliest leaves are the least bitter. I added some to my supper salad tonight and enjoyed that.  The Pennsylvania Dutch were big, big fans of Dandelion salads. When I was much younger we used to forage across all the fields to pick garbage bags full of Dandelion leaves for the Church and Fire Company fund raising dinners. In this area, they make and use a Hot Bacon Dressing on their Dandelion salads. See a recipe for that below.

https://jeffreysaad.files.wordpress.com/2010/04/dandeloin-salad.jpeg

#1 – High in Calcium: Dandelion greens are loaded with calcium. Just one cup of chopped dandelion greens has 103 milligrams (10% of the recommended daily value) of calcium! That’s slightly more than kale! Add two to three cups of dandelion to a smoothie with calcium-rich fruits like orange, kiwi, fig or papaya and you’ll have a green smoothie that has more calcium than any dairy product!
#2 – Rich in Iron: Next to fresh parsley, dandelion greens have a high iron content. One cup contains 1.7 milligrams of iron.
#3 – Low Calories: Like all leafy greens, dandelions are low in calories. One cup of chopped dandelion greens has only 25 calories. While leafy greens are a low calorie food, I actually prefer to use dandelions because they have more calories than other greens. Since I try to get as many calories as I can into my morning smoothies, I add up to 4 cups of dandelion which adds 100 calories of nutrient-rich food!
#4 – Loaded With Antioxidants: Dandelion greens are high in vitamin A in the form of antioxidant carotenoid (beta-carotene) and vitamin C. Vitamin C also helps facilitate iron absorption.
#5 – The Ultimate Detox & Cleansing Green: If your goal is detoxification and cleansing, dandelion greens should be the ones you use in green smoothies! They are said to help cleanse the liver and many detox recipes call for them.
#6 – Lots Of Minerals: Dandelion greens are rich in minerals. Besides calcium and iron, they are a good source of copper (10% RDA), manganese (8% RDA), phosphorus (5% RDA), potassium (5% RDA) and magnesium (5% RDA).
#7 – 14% Protein: Dandelion greens have more protein per serving than spinach. The greens themselves are 14% protein and contain all essential amino acids so it’s a complete protein. One chopped cup contains 1.5 grams of protein.
#8 – Multivitamin Green: Besides vitamin A as beta-carotene (186% RDA) and vitamin C (21% RDA), each cup of chopped dandelion greens are also good sources of vitamins B1 (9% RDA), B2 (11% RDA) and B6 (11% RDA), vitamin E (13% RDA) and especially abundant in vitamin K (357% RDA).
#10 – Health Benefits of Dandelion Greens: The nutrients in dandelion greens may help reduce the risk of cancer, multiple sclerosis, cataracts, age-related macular degeneration and stroke. Dandelion contains anti-inflammatory properties which may provide benefit to those with asthma and other inflammatory diseases.

Hot Bacon Dressing for Salads

Makes about 1-1/2 cups
This Pennsylvania Dutch family recipe is a favorite sweet and sour dressing for green salads with dandelion, endive, or escarole. It works equally well with kale or romaine lettuce when the other greens are not available. It is also the dressing my family uses for our German potato salad recipe, which is in the similar and related recipes links.

Hot Bacon Dressing Recipe Recipe Photo(Pictured with Romaine Lettuce)
A salad with hot bacon dressing complements many meals, but we usually serve it with chicken pot pie, green beans and ham, baked ham or even with turkey for Thanksgiving. It makes a quick, easy and delicious side dish.

Ingredients

  • 1 large egg, well beaten
  • 1/3 cup granulated sugar
  • 1/4 cup apple cider vinegar
  • 3/4 cup water
  • 1/2 teaspoon salt
  • 4 strips bacon, cut into 1-inch pieces
  • 1 tablespoon all purpose flour
Beat the sugar into the egg. Add the vinegar, water and salt; beat well. Meanwhile, brown the bacon in a small saucepan. Stir in the flour and stir until smooth.
Add the liquid to the bacon mixture and cook over medium heat until thickened, stirring constantly. Pour hot dressing over coarsely chopped greens and mix thoroughly until wilted. Serve immediately.
Notes: The dressing can be prepared ahead and reheated, stirring constantly to keep from sticking to saucepan. If it gets too thick, add a little water. Depending on how many greens you use, you might have leftover dressing. It can be refrigerated and reheated before pouring on fresh greens.

Home Raspberry Patch April 2016

Where I live in Pennsylvania it is still about a month too early to do any serious gardening but there are tasks that can be done to get ready for the start of the gardening season. By using some season-extending techniques I have been able to get a jump start on a few things.

Each spring, usually in late March, I thin out my Raspberry patch and inspect it for damage, pests, weeds, and state of the soil. My patch is four feet wide and twenty-four feet long and is a raised bed made from 3x4 landscaping timbers. Those are the cheap, partially rounded ones you can get for between $3 and $4 at any lumber store. I put this bed together in 2001 and transplanted some Red Raspberry roots from my dad's patch. I bought the timbers from Walmart at the end of the summer season that year for $1 a piece and five dollars to haul away all the mulch they had in their display (three truck loads). Anyway, I have been tending this same patch of Raspberries for 15 years now and never had any problems with disease, pests, or fertility. 

So today I thinned out the old, dead canes. Most Raspberries fruit on one year old canes and during the winter after they fruit they die. Then the new canes from the summer will grow, leaf out, and fruit the following summer. If you don't thin them out, and most people don't, the patch gets over-crowded with dead canes. This increases the chances of disease and pests because they will survive the winter in the old, rotting canes. The other bad thing is that they block sunlight from reaching the growing canes. Raspberry canes leaf along the entire length of the cane so they need light to each everywhere. Below is the before and after pictures of the process:
This was the Raspberry patch at the beginning. Because I thin it every year it doesn't look too crowded but about half of those canes are dead and need to be removed. I also will weed the patch and reroute the canes on the left side behind the wires I use to keep the canes out of the grass path on the left side of the bed.

This is the same patch after thinning. You can see five piles of dead canes, I'll run them through the mulcher and use them to mulch around tomato and pepper plants. The rough shredded canes are almost impossible for slugs and snails to travel over. If you click on the picture you will be able to see how much more open the patch is now.

Last year was not a great year for Raspberries, the winter was very severe. This year should be better though if nothing changes. I mulched the bed very heavy in the fall with shredded grass and leaves to protect the roots from the cold winters we have been having. It seems to have worked pretty good. Because the mulch is so heavy the soil is still moist even though it hasn't rained here in quite some time and the Township instituted a "Burn Ban" because everything is so dry. 

Now there is nothing that really needs to be done except to check the patch once a week and watch for weeds and insect pests. The only problem insects I have ever had here are Japanese Beetles. They don't harm the fruit but they will eat all the leaves. I have found that wetting the patch and then dusting the plants with plain powered lime is enough to stop them. 

My patch comes to fruition right around the Fourth of July plus or minus a week. From this patch I'll get about four or five gallons of berries over a three week period. None a single one goes to waste, we love them.

Wednesday, January 20, 2016

As Promised - Splitting Wood

Splitting wood can be tiring, it can be dangerous, it can also be fun and rewarding. Using the right tools and taking certain basic precautions can save you a lot of headaches and protect your limbs. 

Trees are felled or dead trees have already fallen to the ground and are ready to be cut up into firewood. You need to measure your fireplace or the firebox of your wood stove so that you know how long to cut your wood. My wood stove is shallow so my wood gets laid side to side. My dad's wood stove is deep so his wood goes in front to rear. Although his wood stove is much larger than mine, I can burn longer logs. But my wood stove is not very high so I can't burn a log bigger than six inches in diameter. My dad's can take logs almost 12 inches in diameter. So I have to split more wood for my stove than I do for his stove. I cut my wood 18-20 inches long for my stove. The longer the firewood piece is, the fewer cuts you have to make. Over time this matters. So cut your wood as long as is practical.

Once a log is cut into fire wood size lengths, you have to decide whether or not it needs to be split. I have found through several decades of experience that you get faster drying and better burns if you split anything that is over four inches in diameter. Unless you have a very hot fire or bed of coals, round logs are hard to get burning and keep burning. But that works out okay for the last log you put on before going to bed. That slow burn will last longer into the night. My firebox is small and even with a full load of hardwood my fire goes out by about 0200 hrs (2:00 AM). But there are stll hot coals and the room will stay above 65 degrees into the morning.

Okay, so you decide you need to split some logs; what do you need? Well, if you have the money (but if you did you wouldn't be reading my blog) you can get a hydraulic wood splitter that runs off a gas engine or electric motor. A decent one of these will cost you well over a thousand dollars. My dad has one, which we share, but he got it when he was 75 and needed the power to do the work. You have to split a whole lot of wood to get your money back out of a hydraulic splitter though.

The tools below will suffice for most people just cutting enough wood for their own use.

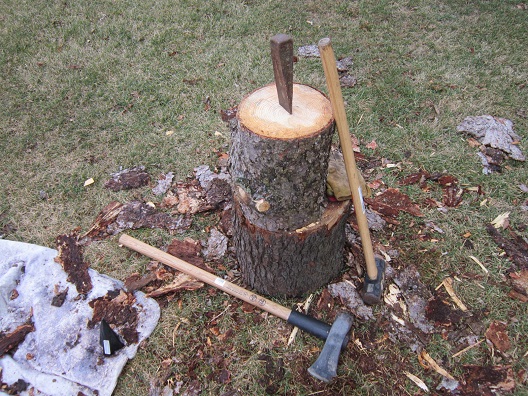
wedges, sledge hammer, gloves, maul, hearing protection, ax

On the right is a plain old, full-size ax. Next is a set of hearing protection. Then a splitting maul, heavy work gloves, an eight-pound sledge hammer and finally two splitting wedges. The bottom wedge is a traditional wedge and the top one is the new cone-shaped wedge. I'll discuss each piece of equipment below. One thing missing is eye protection. I wear eyeglasses so that is covered for me, but if you are fortunate enough to not wear corrective lenses, then you should wear safety glasses when splitting wood.

The standard ax is fine for small diameter, easy to split wood. I use it when splitting Sassafras and Maple, which I have a lot of. But if you can't split the wood with one hit the ax can be a problem. Ax heads are not made to be hit with a hammer or maul. The sides of the ax head, on either side of where the handle goes through the head, are very thin. Also, most axes today are cast, not forged. Cast steel is very brittle and the ax head will shatter if you hit it with a sledge hammer. The other problem with an ax is the cutting edge. An ax is designed to have a sharp edge that cuts wood. Ideally, when splitting, you don't cut the wood, you cause it to separate along the grain. The ax edge often cuts across the grain and quickly gets stuck in the log. If you swing with the ax and miss the wood, or you hit off center and the ax is deflected, it could very easily cut through your leg; and I mean all the way through your leg. We've all seen the TV shows and movies where the burly man is splitting logs with an ax lengthwise, taking a mighty swing and hitting the log on the top. Effective but dangerous. The video at this link shows a much safer way to split wood with an ax: VIDEO

The next tool in my line-up is a splitting maul. These are designed with a heavy head, 8-10 pounds generally, a much wider profile to wedge the wood apart, but with a blunt edge.  Opposite the splitting edge is what looks like a sledge hammer face. That is what it is used for. There will be a warning label on the handle telling you NOT to hit the splitting maul with another tool (such as a sledge hammer) but that is for their liability disclaimer. If it is a decent quality maul, that face is used to hit with a sledge hammer to drive the maul through a tough log if you don't split it with one swing. BUT, there is always a danger when you hit steel on steel. As I have explained before, small pieces of metal can shear off one of the surfaces and that is a dangerous projectile. So always wear eye protection and it is a good idea to wear hearing protection because the PING will damage your hearing over time. Make sure you hit center to center so the edges aren't damaged or mushroomed. The maul is also dangerous if you are inexperienced or tired. The edge is blunt but if you hit your leg with a full swing you would shatter your leg bones and cause a crushing injury to the flesh.

Next in the line-up is a sledge hammer. The sledge hammer is used to drive the splitting maul if needed but more commonly it is used to hammer wedges into the log. I show two of the many types of wedges that are available.

So let's look at using the standard, triangular wedge.
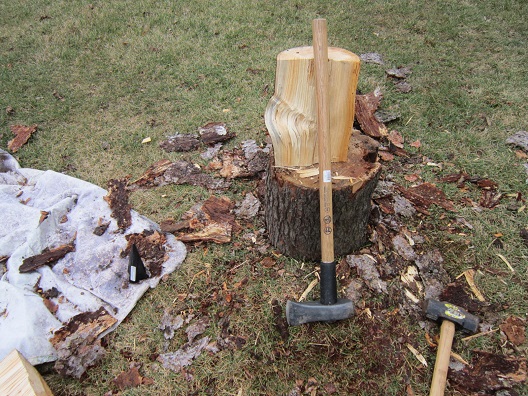
You can generally split a log (in some areas they call these short firewood logs "rounds") up to 14 inches in diameter with one wedge. If the wood is green or much bigger than that, you need to have a second wedge available. With one wedge you just hold it in the center of the log and align it with any obvious cracks that you see. Tap it with the sledge hammer until it will stand by itself as shown here. You could use either the sledge hammer or the flat face of the maul to do this if you can only afford one tool. I prefer a sledge hammer because it is balanced better. Once the wedge is firmly seated in the wood, you can step back a bit and take partial swings to hit with some force. You don't have to go crazy, it is not a "ring the bell" game at the fair. The inclined plane of the wedge will split the wood with just a little effort. Watch the wood and as it starts to crack open you can hit with less force. You don't want to take a full swing and have the wedge become a projectile as it exits the wood.

One more tap here and it will split the log in two. Notice that I am splitting on top of another log. You should do this whenever possible. I always cut a good, solid, large diameter log for a stable base. This brings the log you are splitting up to a better working level. It also protects your tools in case you go right through the log you are splitting. I see some people splitting logs on the ground and that is generally not a good idea. The ground is soft and will absorb a lot of the impact of your tool. This causes you to do more work. The ground will also quickly get soft and mushy, getting dirt on the wood. Lastly, it just isn't a stable platform unless the ground is frozen solid down at least six inches.

Once a larger log is split in half you can generally use the maul to quickly split the halves into quarters or thirds. I usually like a piece of wood with the outside rounded edge not wider than four inches for my stove and that dictates whether I will split the log into four or six pieces.
So here I will now use the maul. But there is a big problem with this piece of Hemlock. Can you see the knot on the left hand side, just about mid-way between the top and bottom? Check out this close-up below:
There is no way you will split through that knot. What that is is the remnants of a branch that grew from the tree when it was very young. It goes all the way to the inner ring of the tree. So I need to split this log down the brown line. That will cleave off nicely. I can then split the log again but parallel, to the back side of the knot. The whole knot then will be contained in one of the split pieces.

The other type of wedge that I have, I got it from my son on my last birthday, is a Collins Wedge from Amazon.com. The site claims that it will split the wood in multiple directions but after using it a full day that never happened; it created one split just like a triangular wedge. I found no advantage to the shape and no disadvantage. It seems that a wedge is a wedge.


It starts easy. There are reports of the tip breaking off. On a couple logs that had lots of knots I ended up using both wedges to get the log split. I'll use them both and see if I find any difference.

So click on this link to see a VIDEO that shows a comparison between using a splitting maul and a wedge. He uses his maul instead of a sledge hammer to hammer the wedge. Now, I don't approve of his jumping swing technique, nor of his complete lack of safety equipment. He also doesn't use a chopping block so his tools go into the dirt and hit each other often. Just pay attention to the amount of force and time he uses to split the first log with a maul.

So that's about all there is to splitting wood. 

Safety Notes:

1. Wear gloves, eye protection, and hearing protection. Steel tip boots would be great but they are not cheap.

2. Start out slow and with easy controlled swings. With experience you can swing harder in a safe manner.

3. Spread your feet apart to a comfortable, balanced position. If you do miss the log, and most beginners do, the maul or ax will hopefully go between your feet and not through a foot.

4. Use a solid, sturdy chopping block. I'm 6'1" and an 18 -20 inch tall block works for me. The heavier the block the better.

5. Stop when you are tired. This is a movement that fitness gurus use for cardio and strength training. It WILL wear you out. Split a few logs and then go stack them to have a break. Pace yourself.

6. Keep a clear area around your work site. Split pieces of wood can fly off with a great amount of force and speed. Keep pets and kids at least 20 feet away.

7. Clean, inspect, and maintain your tools. Handles will crack, eventually. If a handle starts to crack, replace it immediately.  Go to my post on how to replace a tool handle HERE. Oil your tools. A rusty tool is dangerous and will not split as efficiently.

8. Stack your wood under cover so it dries properly. Wet or green wood does not burn efficiently and can cause creosote to build up in your chimney or pipes. That is a fire hazard. You can build a very cheap wood shed out of pallets like I did. Check out that posting HERE.