Friday, February 18, 2022

Cooking Tough (usually Cheaper) Cuts of Meat

    When I was a kid and teenager, we raised chickens for eggs. We kept about 25 hens at any given time and averaged a dozen and a half  eggs a day. But inevitably, a hen would slow down and stop laying eggs. If I had to guess, I would say we got three good years of egg-laying from a hen. So what do you do then? Do you keep feeding them and wait until they just die? No, you don't; for a couple reasons. First, it was a waste of money to feed a non-producing hen. Second, as they aged, the stronger, more dominant, younger birds would start picking on the old bird. There really is such a thing as a "pecking order" in a chicken yard. The younger hens will prevent the weak ones from eating and they will peck at and harass the weaker birds until they die a miserable death. So we would cull them out, give them a merciful and humane death, and then dress them out to eat.

    So now we had a three to five pound chicken to eat. But what you had to understand was these were free-range chickens that roamed a large barnyard and worked hard for their own food, supplemented by cracked corn and kitchen scraps. So by the time they were non-productive at three to five years old, they were pretty tough. My mom and dad liked southern fried chicken and even though these were tough old birds, my mom would bread them and fry them in a cast iron pan! Ugh, they were horrible. It was like eating a chicken-flavored car tire. What we should have been doing was cooking them down in a pot of stock to be used in soups, stews, and pot pies. 

    We also didn't have a lot of money when I was growing up so when my mom bought beef, it was usually very cheap cuts. Now we beef, she understood what to do. Tough cuts of beef were diced up for soup, cubed for stew, ground up for hamburger, or slow cooked in a crock pot as a pot roast. 

    The general rule for cooking tough, cheaper cuts of meat is to cook it for a long time at a low temperature. Crock pots are probably the easiest way to do this. You can prepare the meat and vegetables in the morning, let it cook all day, and enjoy a tender, nutritious meal at the end of your work day. Roasts, soups, and stews can all be cooked this way and as long as you eat everything in the pot, you gain the maximum nutritional value from the ingredients that you used.

    Countertop convection ovens are another good method. When I lived in The Netherlands I bought my first convection oven to slow cook meats while I was involved in one of my many hobbies. The advantage of these types of ovens is that they have up to two hour timers and you can set the temperature as low as 185 degrees. I would take a small roast, rub it down with A1 Sauce and then coat it with spices (Greek Seasoning was my favorite), and then sear it in a hot pan to seal the outside of the meat. Once that was done, I put the meat in a casserole dish type roasting pan with a grate on the bottom to keep the meat off the bottom of the pan. This prevented the meat from boiling. I set the temp at 185 degrees and set the timer to two hours and then went off to do other stuff. When the two hours was done, I rotated the meat, top to bottom, and set the timer for another 60 minutes. After the third hour I took the meat out so it could "rest" for fifteen minutes while I prepared the side dishes. The meat would be medium rare to medium, moist and tender. And this was crap cuts of meat from the military commissary. 

    Outdoor smokers are another good choice, if you have one. BBQ was invented to take tough cuts of cheap meat, that the rich folks wouldn't eat, and make them edible. My son gave me a small smoker a couple years ago and it is a true wonder. It takes some knowledge and skill but you can take rough cuts of meat and transform them into very delicious treats. The secret again is that the meat is cooked for a long time at low temperatures which allows the meat fibers to break down and flavors from the sauce, herbs, and spices to permeate the meat. Everyone loves a good rack of ribs, right? Intercostal muscles, the meat between ribs, is TOUGH. But through low heat, long duration cooking, it becomes tender, delicious ribs.

    LEARN TO COOK: Research and learn new ways to prepare meats, starches, and vegetables to take advantage of and use the cheapest ingredients you can buy (when your situation requires this). People around the world that have less than you do have been surviving this way for hundreds of years.

Thursday, January 27, 2022

Food Scarcity and Cost in the Near Future

"This bay of fertilize would have cost me around $18,000.00 last year. Today we put it in for just over $40,000.00. A tote of Roundup, 275 gallons, last year $4900.00 and today just over $14,000.00. This is just 2 of the inputs for growing a crop. This is not a political statement so do not take it as such. This is real world prices farmers are having to battle." - Owner-operator at Tri-C Farms, Tompkinsville, KY.

I grew up on a farm in Eastern Pennsylvania but I haven't farmed since the 1980s: I claim no expertise in modern farming. But agriculture and associated subjects such as the biology of soil, plant use of soil nutrients, composting, organic and sustained farming, etc. are still interests of mine and I do still read articles about them. Most large farms rely almost solely on chemical fertilizers, herbicides, and pesticides to produce the annual crop. Their soil is nearly dead from high chemical use.These inputs are getting more and more expensive as inflation climbs, the current lack of interest in working continues, and petroleum prices soar.

Amish, Mennonite, and organic farms are not in the same dire situation so it might be a good idea to locate those farms now and see if they have an on-farm stand or operate a Community Supported Agriculture (CSA) farm. (Search for a local CSA at this site:  https://www.localharvest.org/csa/ ). These farms produce less per acre but with the use of manures, compost, and natural/mechanical pest and weed controls they are not as affected by inflation and petroleum costs. 

Large corporate run farms simply cannot obtain and spread enough manure and compost to support the high yields they must produce to turn a profit. But small food plots can. During the hardships created in Russia during the reign of the Communist Party (USSR days), food was scarce. Central control of agriculture in the world's largest but sparsely populated country did not work very well. To survive, almost every family had a small plot of land outside the city that they intensively gardened to produce fresh fruits and vegetables. With a small plot you can amend the soil with ease and control pests and weeds manually.

You can do the same. I have posted several times about my own gardening and you can go back through the posts here and find those. But today, I'm just going to talk about the wisdom of finding a plot of ground that you can raise some food to help out your pantry. Where? I hear you, sometimes it is hard.

In my own yard I have maintained a 14x40 foot garden for many years.

If you don't have a yard, you'll have to search for alternate locations.

When I was stationed at Fort Polk I had enough room in my fenced in back yard to build an "L-Shaped" raised bed that was four feet wide and twelve feet long on the long side and four feet long on the short side. That gave me a garden of only 64 square feet. But the soil was perfect; made from a mixture of sphagnum moss, course sand, composted manure, and compost from my compost bin. I grew enough food in that small plot, using Square Foot Gardening techniques that I had to give food away. 

When I was stationed at Fort Belvoir I rented a 40x60 foot plot from the county for $30 a year. I raised so much there that I actually started selling the excess at work.

In The Netherlands, I got permission from my landlord to pull up pavers from my back patio and created a 6x14 foot garden that provided fresh vegetables year round. Not enough to feed a family but more than enough to supplement what foods I was buying.

It is possible that you can find a landowner that would be willing to let you use a small plot to garden in exchange for work. 


Empty store shelves is a more and more common sight and is not going to get any better any time soon. The ongoing labor shortage, the supply chain bottlenecks, bad weather, pandemic-induced panic buying, etc. are not going away. YOU need to establish your own supply chain; that could be foraging, gardening, buying into a CSA program at a local farm, etc. But you need to do something. When food gets scarce, panic buying will empty the shelves and run up the prices.

Monday, January 17, 2022

Food Bargains - Rock Soup

One of the best ways to provide a good meal inexpensively is to utilize cheap foundations and then build on it. I often think of the old story about "Rock Soup". I first read this story while in elementary school back in the 1960s. Below is a highly condensed, and so not very entertaining, version of the story.


    Once upon a time, there was a great famine in which people jealously hoarded whatever food they could find, hiding it even from their friends and neighbors. One day, a kindly looking stranger came into a village and began asking questions as if he planned to stay for the night.

“There’s not a bite to eat in the whole province,” he was told. “Better keep moving on.”

“Oh, I have everything I need,” he said. “In fact, I was thinking of making some Rock Soup to share with all of you.” He pulled an iron cauldron from his wagon, filled it with water, and built a fire under it. Then, with great ceremony, he drew an ordinary-looking stone from a velvet bag and dropped it into the water.

By now, hearing the rumor of food, most of the villagers had come to the square or watched from their windows. As the stranger sniffed the “broth” and licked his lips in anticipation, hunger began to overcome their skepticism.

“Ahh,” the stranger said to himself rather loudly, “I do like a tasty rock soup. Of course, rock soup with cabbage — that’s hard to beat.”

Soon a villager approached hesitantly, holding a cabbage he’d retrieved from its hiding place and added it to the pot.

“Wonderful” cried the stranger. “You know, I once had rock soup with cabbage and a bit of salt beef as well, and it was fit for a king.”

The village butcher managed to find some salt beef . . . and so it went, through potatoes, onions, carrots, mushrooms, and so on, until there was indeed a delicious meal for all.


So the concept is to take something cheap and add to it until you have something "luxurious". I do this with potatoes, rice, and noodles. In this instance let's talk about noodles. 

Anyone that was ever in the military or a money-less student in collage has probably ate a few meals of Ramen noodles. I have eaten Ramen, or something similar, hundreds of times. And sometimes just a pack of noodles by itself is a nice, light meal or snack. But when I want a real meal, I re-enact the Rock Soup story.


This past weekend I bought two servings of Maruchan Yakisoba noodles. These are 77 cents each. You can get Raman noodles for about 15-20 cents a pack. I like these Yakisoba noodles better, even though they are three times the price, because they are a larger serving size, have some dried vegetables in them, and they have a better nutritional profile. 


As you can see, one serving has 510 calories, a surprising amount of fat, almost no sugar, and 11 grams of protein. The biggest downside is the high level of salt. Most of that will be in the broth and I rarely drink the broth so I probably cut that amount to a manageable half.

Whichever type and brand of noodle I have on hand, that is my "Rock Soup", and now I will enhance it like the villagers did in the story. Everyone has bits of leftover meat in the refrigerator or freezer from a prior meal. I will often have lunchmeat that was a day or two away from starting to spoil that I threw in the freezer. I'll get that out, cut it up into pieces, and fry it in a pan to make sure it is safe to eat. Otherwise, I dig through the freezer looking for small prices of leftovers that aren't big enough to be a meal by themself. I cut that up into small pieces, microwave it, then throw that in with the cooking noodles. Then I hit the vegetable/fruit drawer in the fridge and grab whatever is there; onions, peppers, green beans, carrots, peas.....whatever. Throw a good sized handful of chopped veggies in with the noodles. Cook a little longer that the package instructions because you have more solids to cook.

So we are looking at 10-15 minutes of preparation and cooking time to make a fantastic luxury-level Rock Soup that tastes great, is very nutritious and costing maybe a dollar to a dollar twenty-five at most.

Saturday, January 15, 2022

Mechanical Repairs

 I have mentioned before over the years that one way to have additional money for food is to avoid other unnecessary costs. One area everyone can improve on is self-sufficiency, which saves thousands of dollars annually.  Basic home repair involving plumbing, electrical, painting, woodworking, etc. should be on everyone's list of skills to improve. Basic mechanical knowledge is another.

I have never attended any formal training in mechanics but I do have a solid foundation in the sciences and was especially good at Physics and Chemistry. Physics comes in handy the most and I have a deep understanding of the Laws of Physics to include simple and complex machines (levers, wheels, inclined planes, etc.) and the Laws of Motion. With that knowledge, and 55 years or so or tinkering, doing repairs in the field, and just experimenting, I can look at almost any machine or mechanical device and understand how it is put together and how it works. 

I have a Kubota B7500 tractor that came with a front mounted snow blower. This thing is awesome for moving a lot of snow, very fast. But it came with no instructions. In fact, I didn't even know it came with the tractor as an accessory; it wasn't listed on the advertisement (the tractor was bought from a Used Equipment lot). So I laid out all the parts, studied them and their probable attachment points, and mounted it the first time in about two hours (three years ago). A couple days ago (way later than usual) I decided to get the tractor and blower set up for a forecasted snow storm coming our way.

The big snow is still up in the air but regardless, it is way over due to get the snow blower hooked up. My B7500 tractor stays up on the farm property for maintaining the roads and woods during the warm months. I went up yesterday to unmount the flail mower and the belly mower, loaded it on the trailer, and brought it down to the house. Then I had to unmount the brush guard and belly mower front mount. Next is to mount the snowblower drive train frame.

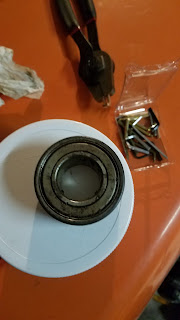
This is the frame that the snow blower gets attached to. The cylindrical part is a coupler that joins the Power Take Off (PTO) shaft from the tractor to the PTO shaft that attaches to the snow blower. When I turned the PTO shaft coupling, the bearings felt dry and crunchy, not a good thing for bearings. It has no grease zirks so I spent the next hour disassembling the shaft coupling into its seven internal parts. I have never disassembled anything like this but figured it out as I went. There are seven internal parts: two split rings (I had to go buy a special tool to remove them), two locking collars that hold the shaft tight to the bearings, two bearings, and the shaft itself.


Below is what one of the two bearings looked like. They, unfortunately, cannot be taken apart and repacked with grease, which was my original plan. So I had to drive 30 minutes to the nearest Equipment repair shop to get two new bearings. Online the best price was $27. At the shop, they had two bearings in a box of customer returned items and the shop charged me only $16 for each. So I saved $22 right off the bat.


The tool shown is the split ring pliers I needed to remove the bearings. It comes with various tips for different size rings and different angles. Once I removed the split rings I needed to remove the locking collars, which has Allen screws being used as "Set Screws" to clamp the locking collar to the shaft. These were stuck in place and it took careful tapping with a hammer on a pin punch and prying to get the collars removed. The shaft came out with one of the collars and then I punched out both bearings.


I spent another hour cleaning all the parts with a wire wheel, a file, and sandpaper then solvent to get the burned grease off the parts. Then tapped in the new bearings, added the locking collars, then the split ring and presto, a brand new coupler.


 Eight bolts attach this frame that supports the two PTO shafts and the snowblower itself.


 Fully mounted and ready for the snowblower and PTO shafts.


So, all in all it took me about five hours to do this installation, which included removing the mower mount and brush guard, repairing the PTO coupler (one hour drive to the equipment sealer and thirty minutes to go to a car parts store for the split ring pliers). Total cost was $32 for two bearings and $37 for the split ring pliers (which will get lots of future use); $69 total. Had I taken the tractor and snowblower to the tractor shop to have them do all the work, this would have been over $300.

Time, knowledge, and a willingness to get my hands dirty saved me $231 on just this one repair.

Tuesday, January 4, 2022

Winter Car Survival Kit

 4 January 2022 Headline:

"Motorists are finally rescued from snowbound I-95 in Virginia after more than 27 hours trapped in their cars when Storm Frida dumped more than a foot of snow and closed 55 miles of the busy freeway"

It happens. I commute, weekly, from Aberdeen Proving Ground, Maryland, to my home three hours north in Pennsylvania. I have, on more than one occasion, had to pull off the road because of unsafe driving conditions and spend the night in my car. I was comfortable because I was prepared. Are you?

Horror stories from I-95: People growing desperate without food, water, gas and phone batteries are going dead.

NBC correspondent Josh Lederman reported on Tuesday morning that he was stuck on the highway overnight with his dog.

He said that traffic came to a halt around 8pm near Stafford on Monday night during his trip back to DC and he hadn't moved much since then, nor had he seen any emergency vehicles.

'Once it got to be 9pm or 10pm, I realized we were going to be here all night long,' he told Hoda Kotb on a Today segment Tuesday morning, and added that he has been eating the few granola bars and pack of gum he luckily had in his car. 

'We started to see a lot of drivers turning their cars off to conserve gas, people running out of food and water, kids and pets holed up for so many hours, people letting their pets out of the car to try to walk them on the street,' Lederman added, noting that he was worried there would be a medical emergency if someone ran out of gas in the 26-degree weather.


Make a cold weather emergency kit and store it in the backseat of your car. NOT THE TRUNK!

If you have an emergency on the road there is no guarantee that you will be able to access the trunk.


This is a link to a previous post I wrote on car emergency kits: Click here or cut and paste the URL below into your browser.

https://eatbettercheaper.blogspot.com/2016/11/vehicle-winter-safety-kits.html


Monday, October 18, 2021

Cold Weather Kayak Survival

 Many people only kayak or canoe in the warmer months but they are really missing some interesting times on the water. Snow and ice add a whole new dimension to being on the water. But you must be prepared.


In my home state, Pennsylvania, it is required that all kayakers wear a personal flotation device between mid-October and mid-April. This is because of the very real danger of hypothermia if you would roll your kayak and immerse in cold water. With a PFD, it is much more likely that you could find your way to the shore, if on a river, or back into your kayak if on a lake far from shore. But what then?


Before we explore that, let's talk about "Cold Shock". Last winter, Cold Shock was often a topic of discussion when people would post pictures of themselves kayaking in winter. Many people would accuse them of flirting with death because no one survives cold shock if they plunge into icy water. But this simply isn't true. Certainly, an unfit, unhealthy person that is not dressed appropriately would be in grave danger if they rolled into cold water. Cold Shock is real; but it can be mitigated. First point I often make is that no one should kayak in cold water without first doing a couple "polar plunges". Purposely jumping in to icy water in a training environment is one key to survival. You need to experience the cold and what it does to both your motor skills and your thinking. As a Soldier for 36 years, we did this often in training and so I am fully aware of what happens to me in cold water and would not likely suffer from cold shock. But I would still get cold and would be likely to slip into hypothermia just like anyone else. The second thing is to dress appropriately. If you have the money and inclination, buy a good quality dry suit and wear it under your outer garments. This will delay the chilling cold and allow you to take measures to recover. But if you don't have the money, you can still up your odds by wearing clothes that will help to keep you warm longer. I wear thin wool under garments (wool retains some insulation ability even when wet) with a synthetic layer over that. My top layer is a water proof rain suit that is sealed with tape at the ankles and wrists. The waist band of the coat and pants are snug. Water will get in, but not as much and what water does get in will warm up and form a thermal layer like a wet suit.


So, what do you do after you roll? Get out of the water as soon as possible, obviously. I highly recommend that you put together a survival bag and keep it available in the cockpit of the kayak, NOT inside a sealed compartment. You won't have the energy to save your paddle and kayak and other items you have in the boat; you have to concentrate on saving you. So make sure you can grab this bag and get to shore.


What to have in the bag. My basic survival bag is shown below. I use a 20 liter dry bag. In it I have a thick hooded sweatshirt, wind and water resistant sweatpants, a long sleeve shirt, heavy wool socks, wool gloves, a neck gater, a water and wind proof shelter (aluminized tarp), a fire-making kit in a waterproof container, chemical hand-warmers, energy bars, and a large towel.


These items go into the bag in the reverse order of what you need most. So the food, fire kit, tarp, and chemical hand-warmers go in first. Then the neck gater and gloves. Then the socks, sweatshirt, pants, shirt go in. On the top is the towel. 


When you get out of the water you need to open the bag but leave the contents inside. Take off any and all wet clothes. Dry off with the towel, change into dry clothes. Use the shelter tarp to block the wind. If you need to start a fire to warm up do so with the shelter set up behind you as a reflector (one side of the shelter tarp is silver and it will reflect the heat back to you. (The picture below is from a commercial site on the Internet)


If you are remote, and can't walk out, use the fire to dry your primary clothes and shoes. Keep yourself warm but not overly warm; you don't want to sweat and get your fresh clothes damp. If you can communicate by radio or phone, call for help. If you can't, rely on the trip plan you put together and left with someone to get any recovery plan started when it is time to do so.


What's a Trip Plan? Before going on the water you need to complete a detailed trip plan. This plan will include your route (include a map printed from Goggle Maps if that is your only option), your expected timeline. Where you are going onto the water and where you are coming off the water. Include a description of your vehicle (Make, Model, Color, registration plate number). Pre-plan emergency signals; whistle, lights, smoke, gunshots, etc. Describe your watercraft; it might float downstream or across the lake. Give this plan to someone at home and put one on your vehicle.


With proper training, planning, and appropriate precautions, winter kayaking can be fun, safe, and adventurous. Just do it right and don't become a statistic.


Think you can't roll your kayak? Yeah, I didn't either; until I did. I was duck hunting on a river in Eastern PA in December. It was 17 degrees and the water had ice on the edges. We had only gone about a mile downstream when the front of my kayak got caught on a rock as I tried to navigate around a boulder too close to shore. The kayak turned sideways in the current and rolled under me dumping me into the ice cold water. I was able to stand up quickly and my rainsuit kept out most of the water. But my hat and gloves were soaked as were the ends of my shirt sleeves and my socks. I pulled everything to shore, grabbed my drybag, and used the contents as I described above. I pulled off the wet clothes, toweled off, and put dry clothes on. I used my mostly dry shirt I had been wearing to dry the inside of my boots before I put my feet with dry socks into them. It took all of 15-20 minutes to recover, drain the water from my kayak, get all my gear stowed again, and get back to hunting. Preparation, my prior training, and being calm prevented a disaster.

Sunday, January 24, 2021

Processing a Wild Duck to Eat


 A Successful Hunt


My oldest son has a YouTube channel called "The Versatile Hunter", but it is about more than just hunting. He started out offering fishing videos initially for family and friends since he, like I was, is in the Army and away from home. The early videos are a bit rough but his current ones are pretty polished. The nice thing about his videos is that they are very honest, he talks about what he did wrong as well as show you what worked. He also brings you along to learn as he is learning. He does a lot of research, corresponds with others who are more experienced, and then he tries it out.


On my blog here, I have wrote about hunting and fishing as the means to bring additional food into the house. My son's videos will add to that as he explores multiple ways of hunting for multiple species. He has been hunting and fishing with me since he was ten years old (fishing) and 13 years old (hunting). He and his wife get a good portion of their protein from fish, birds, and game. I highly recommend that you subscribe to his channel linked above and follow along as he explores new lands, new waters, and new ways to hunt and fish.


We started waterfowl hunting about three years ago and my son is much more into it than I. I enjoy it, my problem is I had severe frostbite more than once and as a result my hands and feet are overly sensitive to the cold. We hunt on lakes, canals, creeks, and rivers. We mainly hunt from kayaks, which adds a bit of difficulty, a little bit of risk (rolling into 32 degree water when it is 8 degrees is not fun, I know because it happened to me a couple weeks ago), but is so very much fun and productive. 


I'll write more about how we hunt for waterfowl in another posting. Watch this video to see how relatively easy it is to prepare a duck (or any bird really) for the kitchen. We eat duck and goose regularly and it is delicious.


Thanks for reading.